Entering a Client Payment
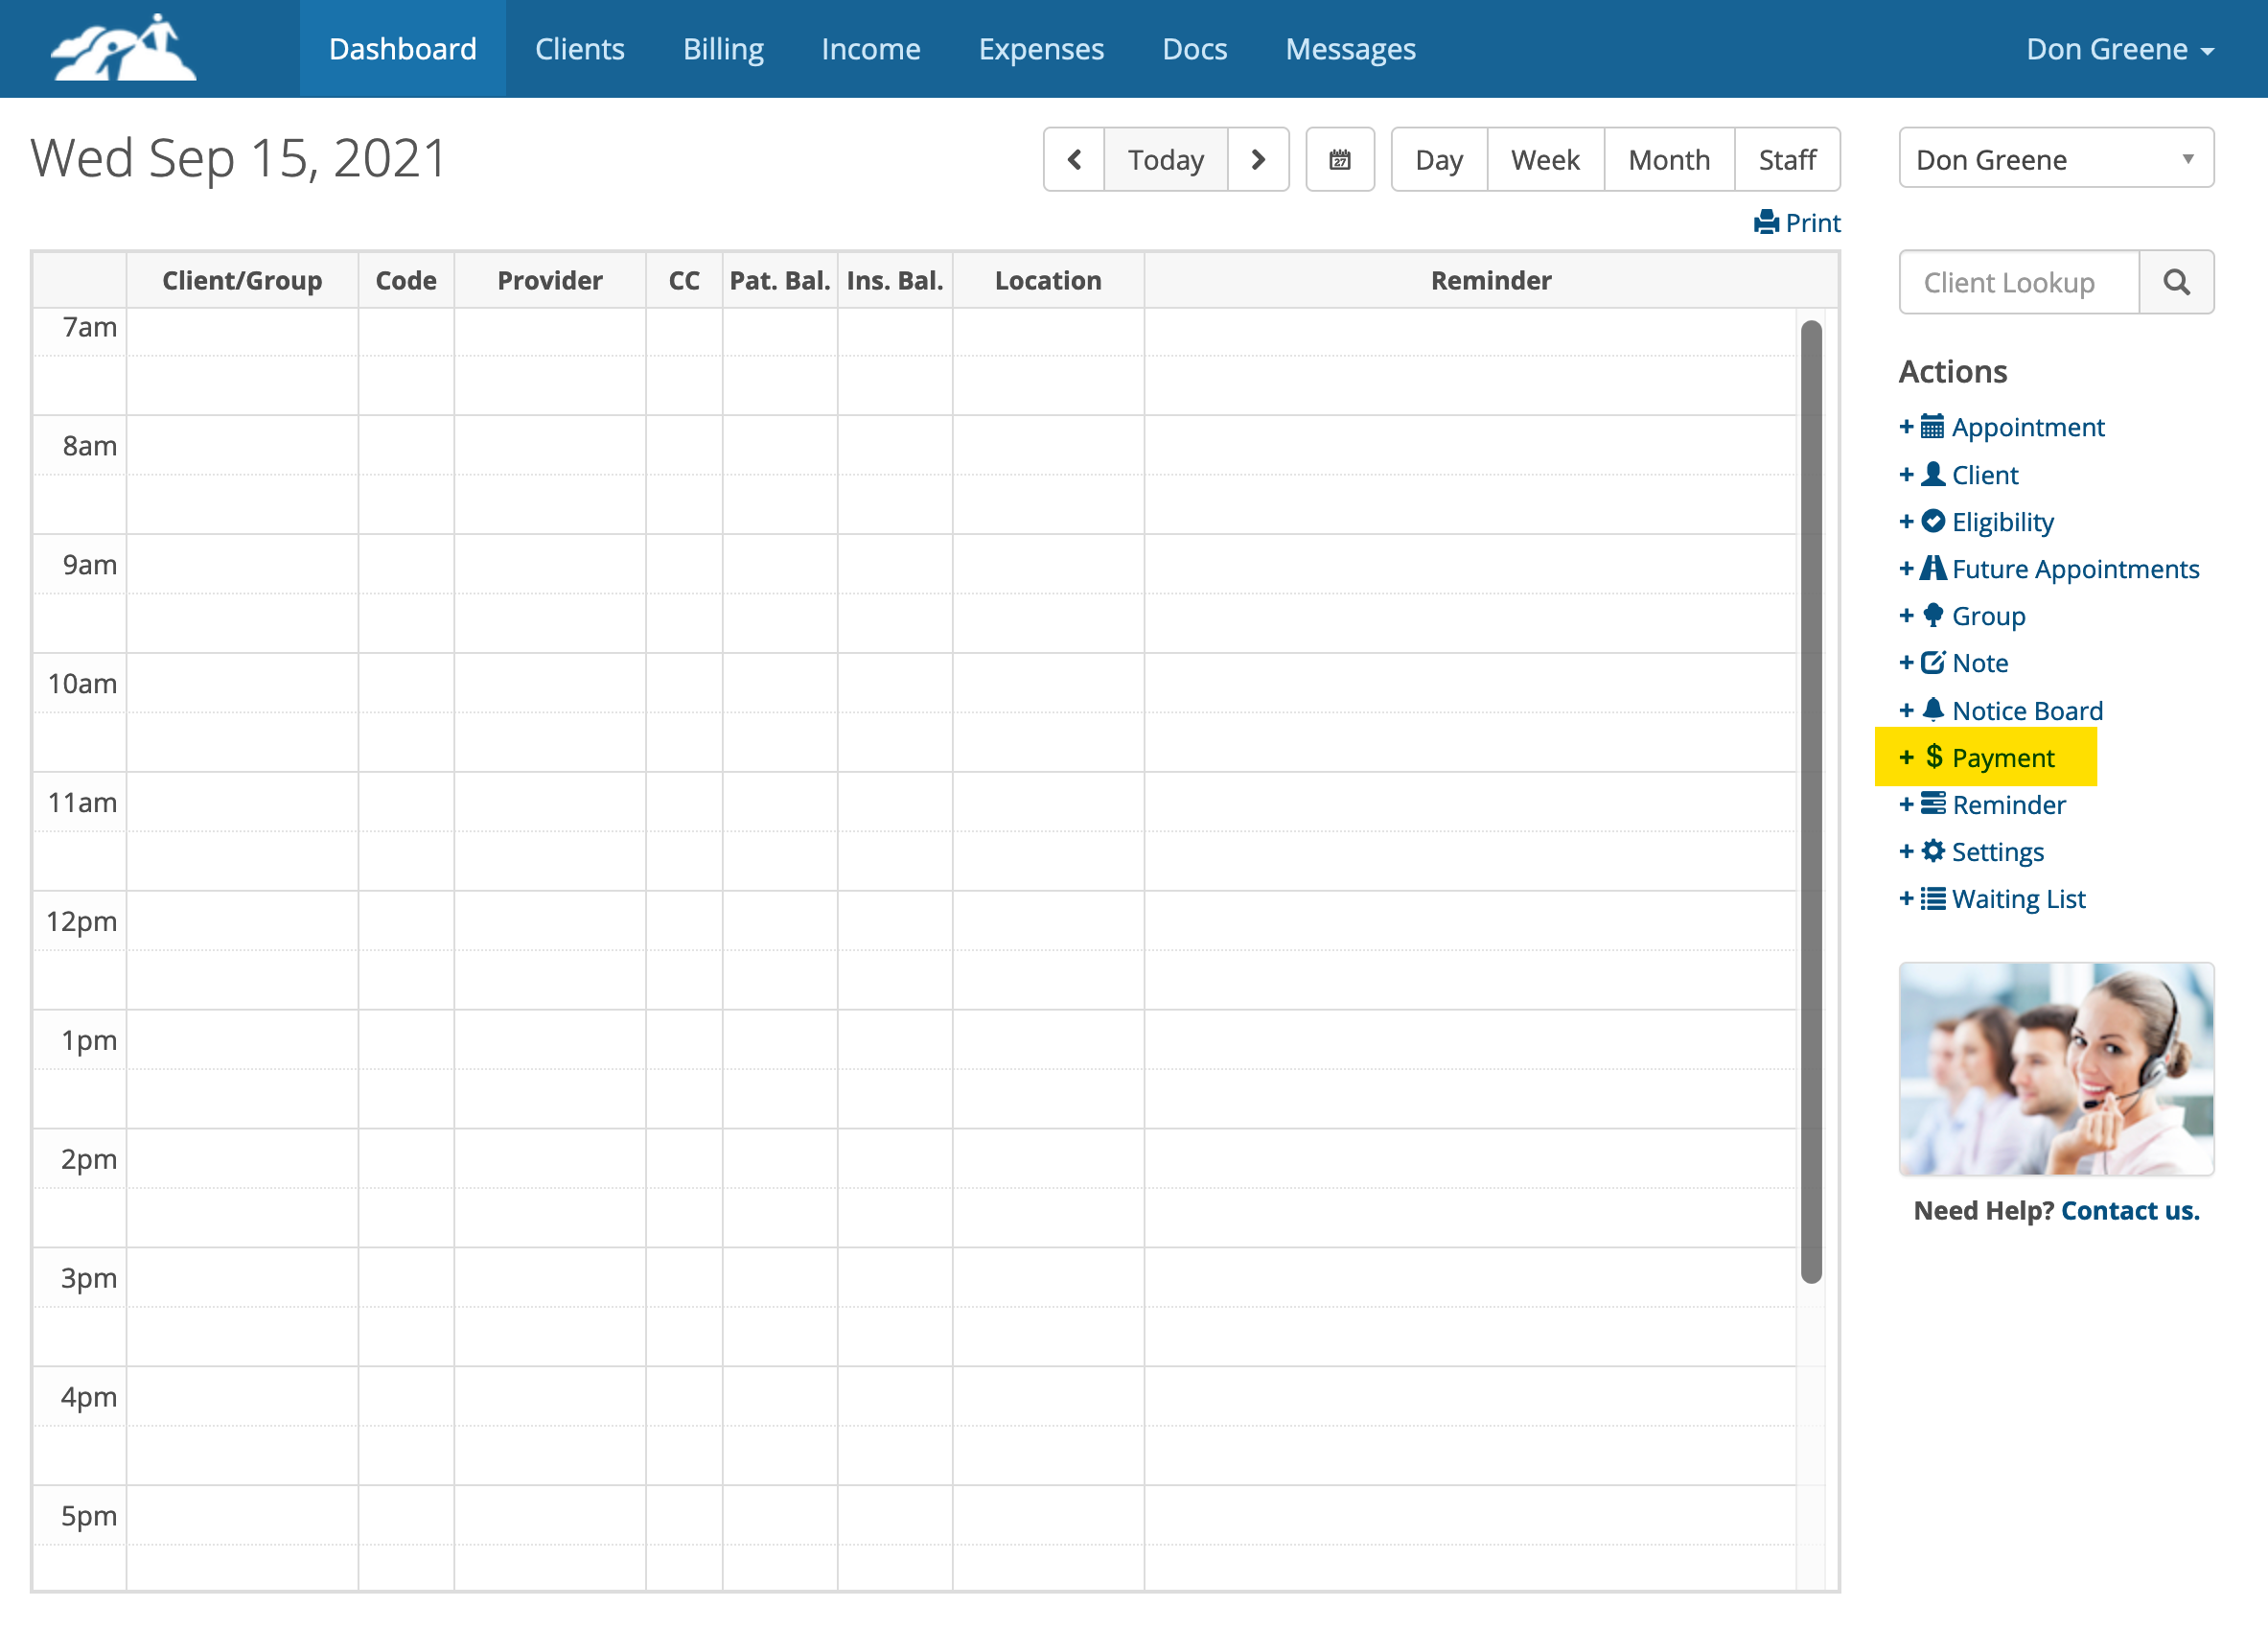
Client Payments are done from the Dashboard by clicking on +$Payment under the Actions menu.
Client Payments are done from the Dashboard by clicking on +$Payment under the Actions menu.
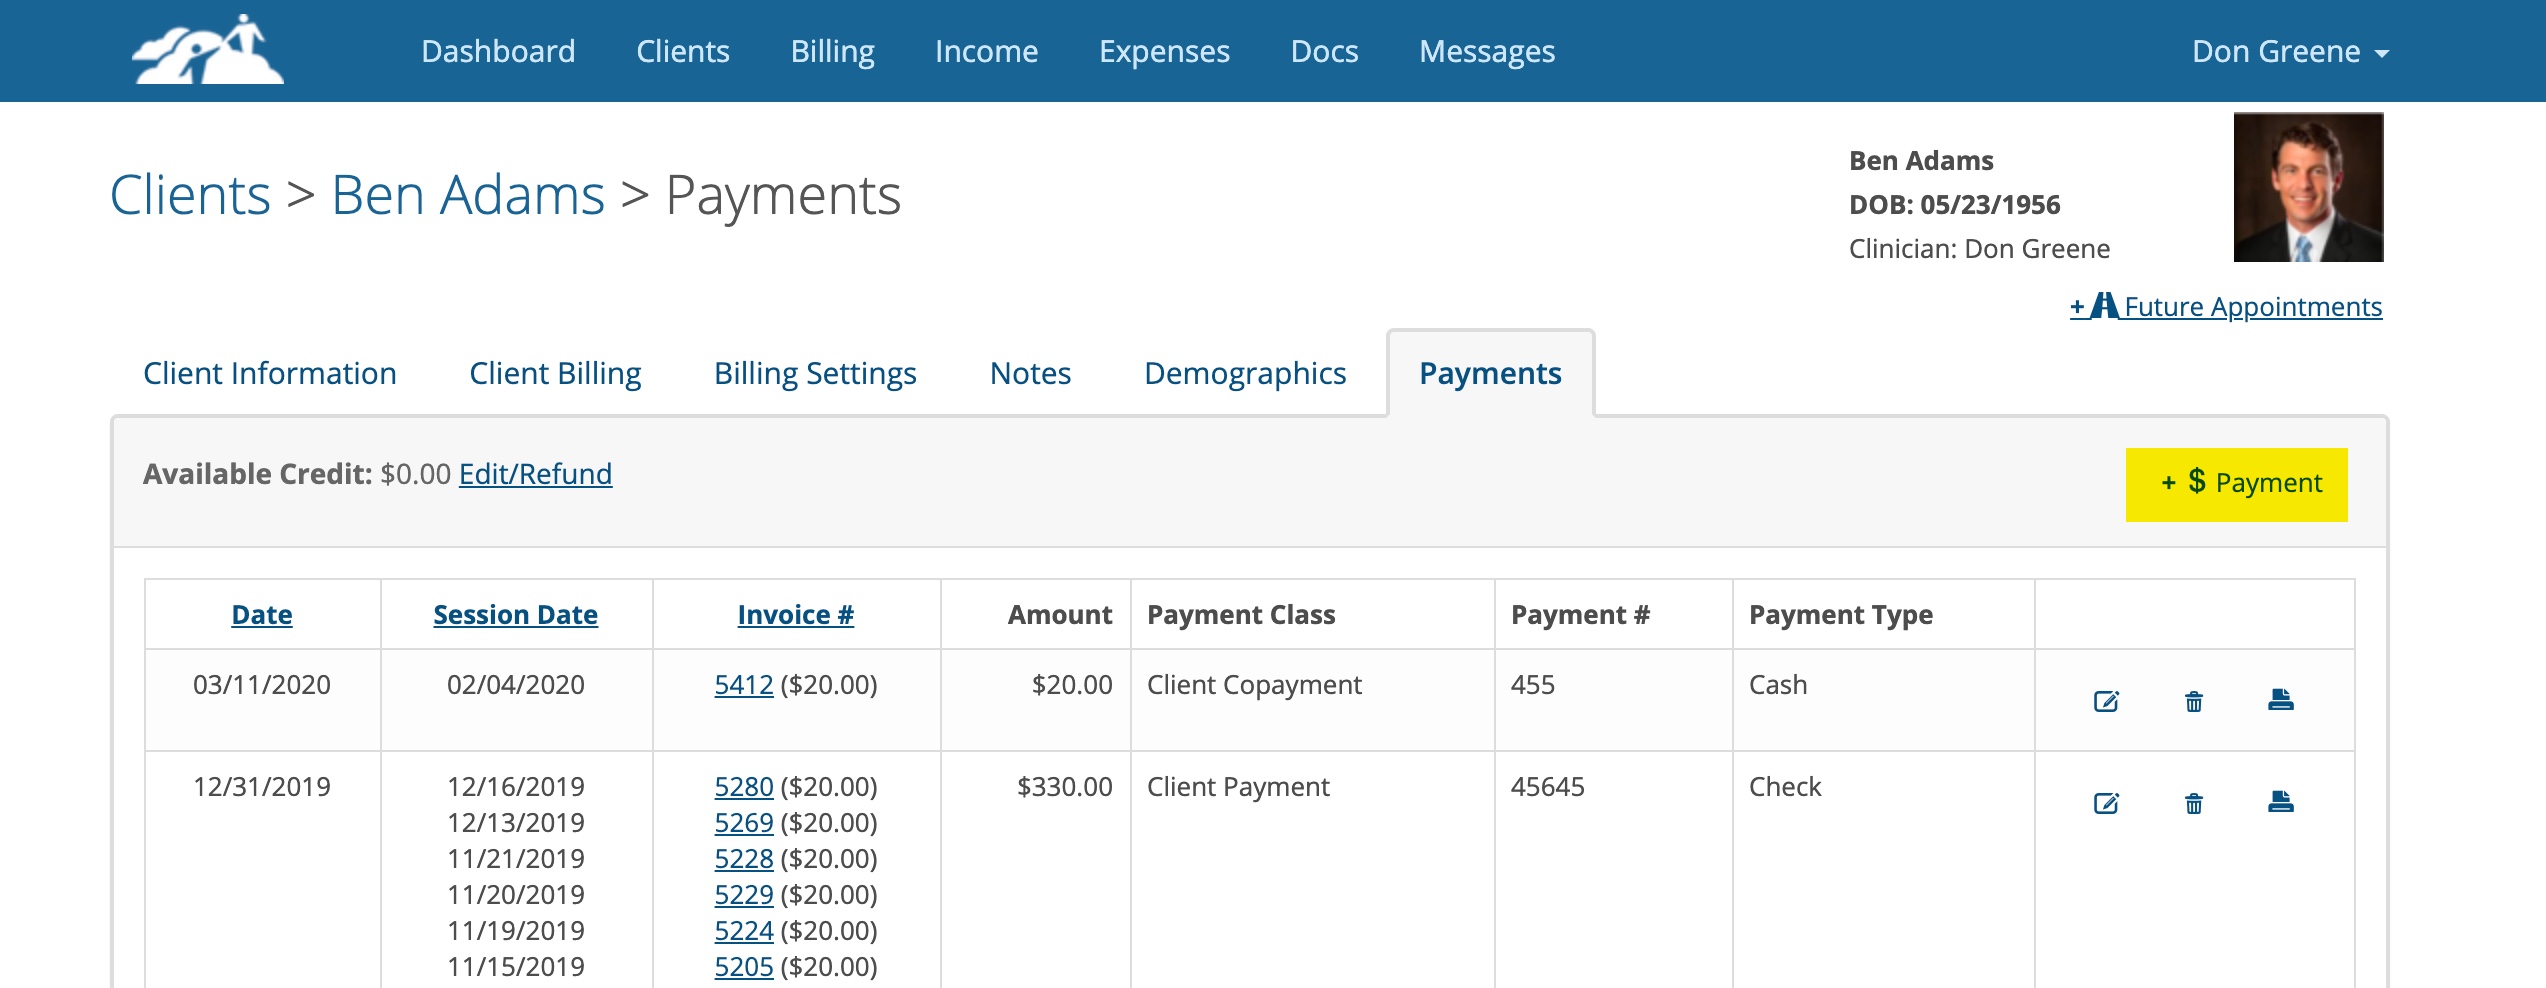
Payments can also be done in the Client’s chart on their Payments tab by clicking on +$Payment.
You can take whatever form of payment you have setup in the system. The defaults are cash, check and credit card.
To record a Client payment click on the +$Payment button. The payment window will appear.
To record a Client payment click on the +$Payment button. The payment window will appear.
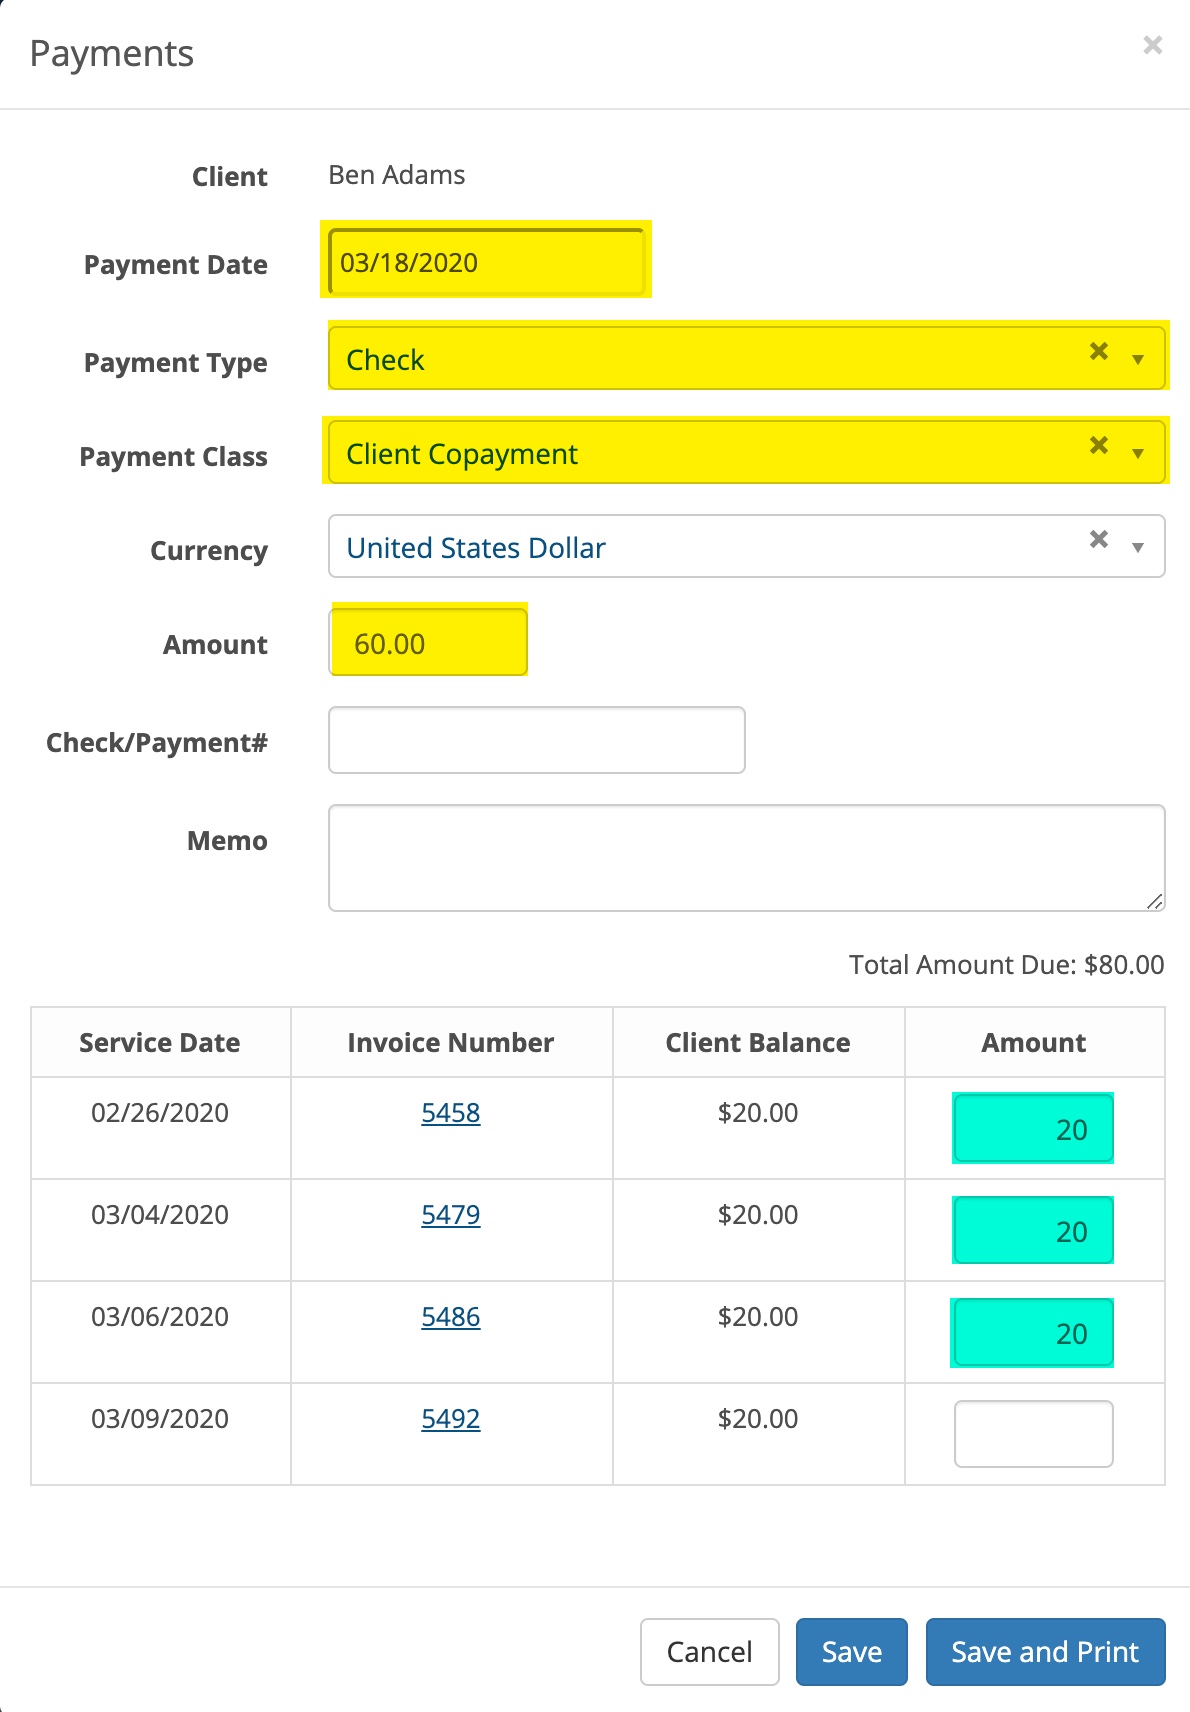
- Select the Client
- Select the Payment Date. The default is today’s date
- Select the Payment Type (cash, check or credit card)
- Select the Payment Class (copayment, client payment or payment towards deductible)
- Enter the dollar amount you are accepting from the Client
- Enter the payment number if applicable (i.e. check number)
- The Memo field is optional
If the client has an outstanding balance the open invoices will appear at the bottom of the payment window. The dollar amount you entered will be allocated across the open invoices starting with the oldest first. You can override that by moving the dollar amounts to the invoices you want to credit with this payment.
If no outstanding amounts are shown in the window, the money you collect will be added to the client’s payment page as a credit towards future sessions.
There are two save buttons on the payment window. Click Save to record the payment or Save and Print to save the payment and print a receipt for the client.
If no outstanding amounts are shown in the window, the money you collect will be added to the client’s payment page as a credit towards future sessions.
There are two save buttons on the payment window. Click Save to record the payment or Save and Print to save the payment and print a receipt for the client.
Entering a Payment that Creates a Credit
There are a couple of scenarios that you might encounter.
There are a couple of scenarios that you might encounter.
Scenario #1
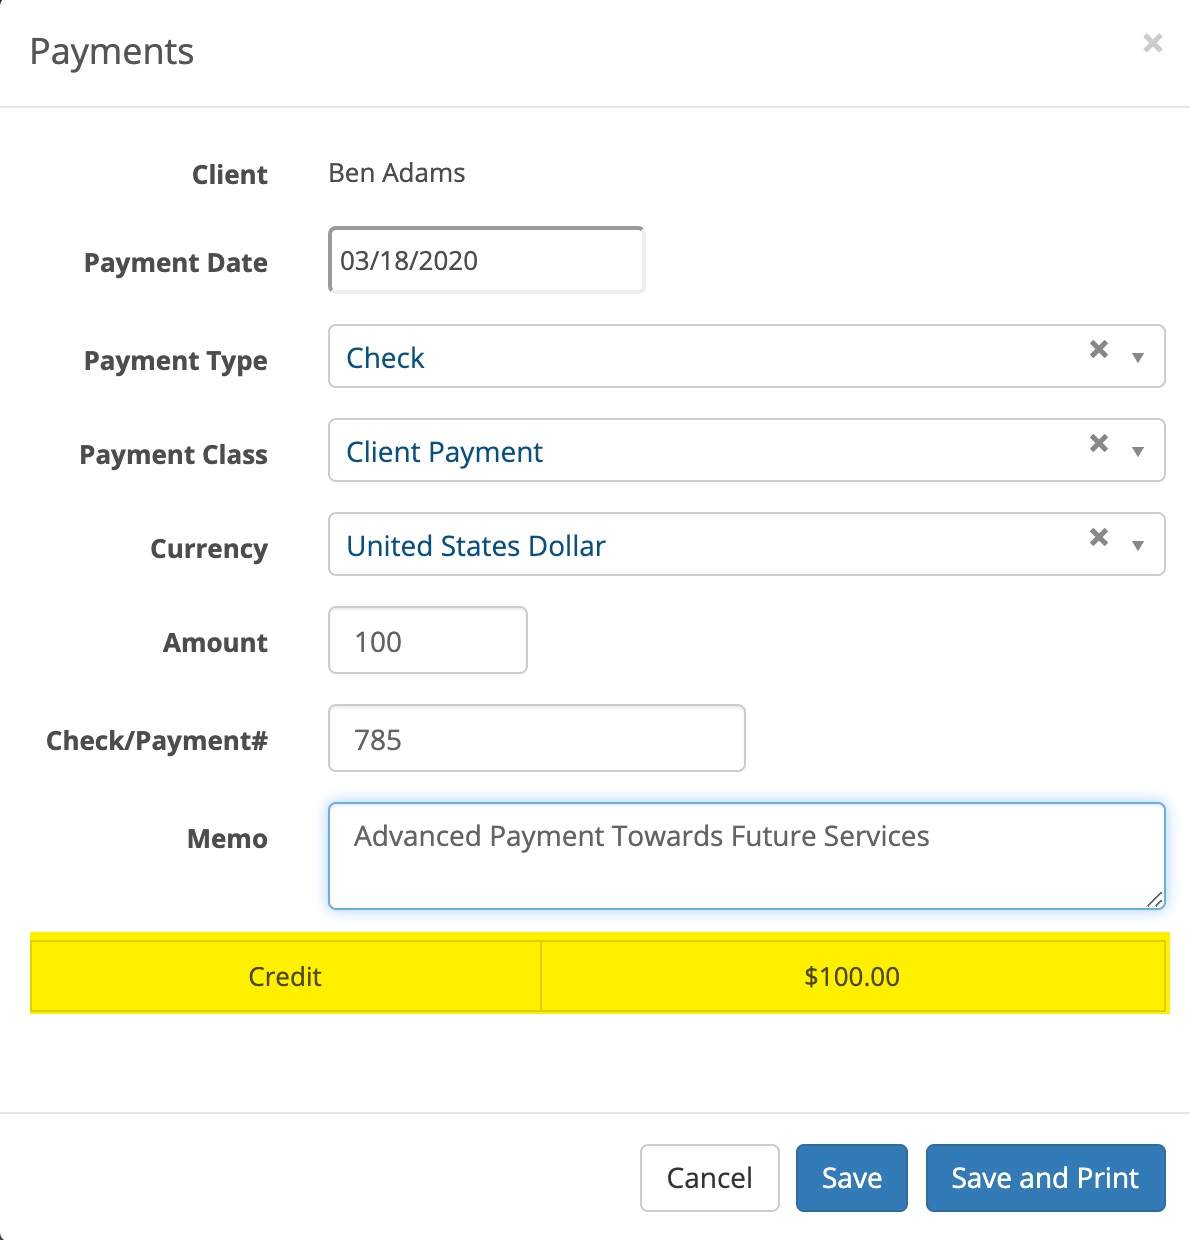
The client doesn’t have an account balance and wants to pay in advance for your services. Click on one of the +$Payment buttons to open the payment window. Select the payment type, payment class and enter a dollar amount. When the dollar amount is entered you will see a Credit Box appear below the memo box. When you save this it will label this payment as a credit that can be used for future services.
Scenario #2 Let us say the client does owe you for a past service AND is giving you more money than is owed. In this example the client owes $20.00, but gives you an extra $20.00 for next week’s copay. Enter the dollar amount you are given in the amount box and $20.00 of the money will automatically apply to Invoice No. 1513. The other $20.00 will appear as a credit at the bottom of the window.

Using a Client Credit
There are a couple of scenarios that you might encounter.
There are a couple of scenarios that you might encounter.
Scenario #1
You go to record a payment and notice under the payment date that the client has a credit. See the highlighted are below:
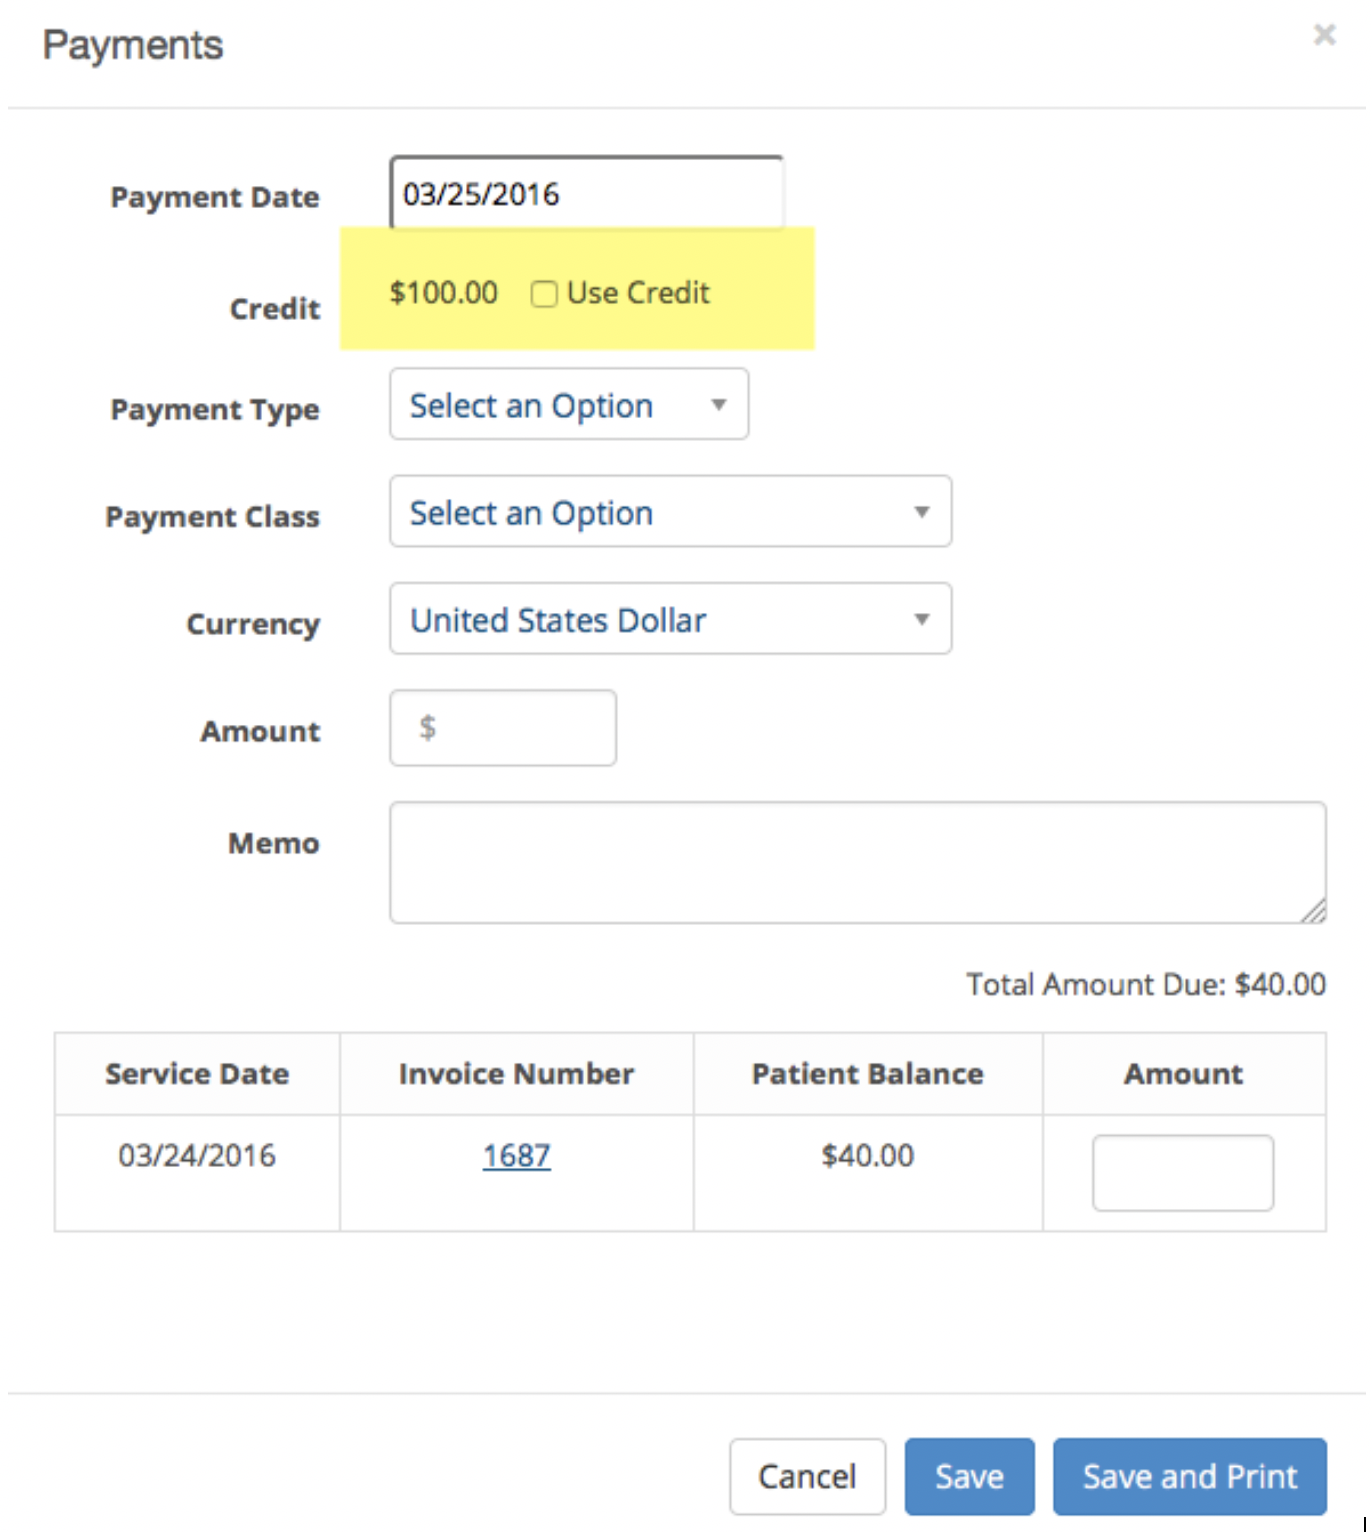
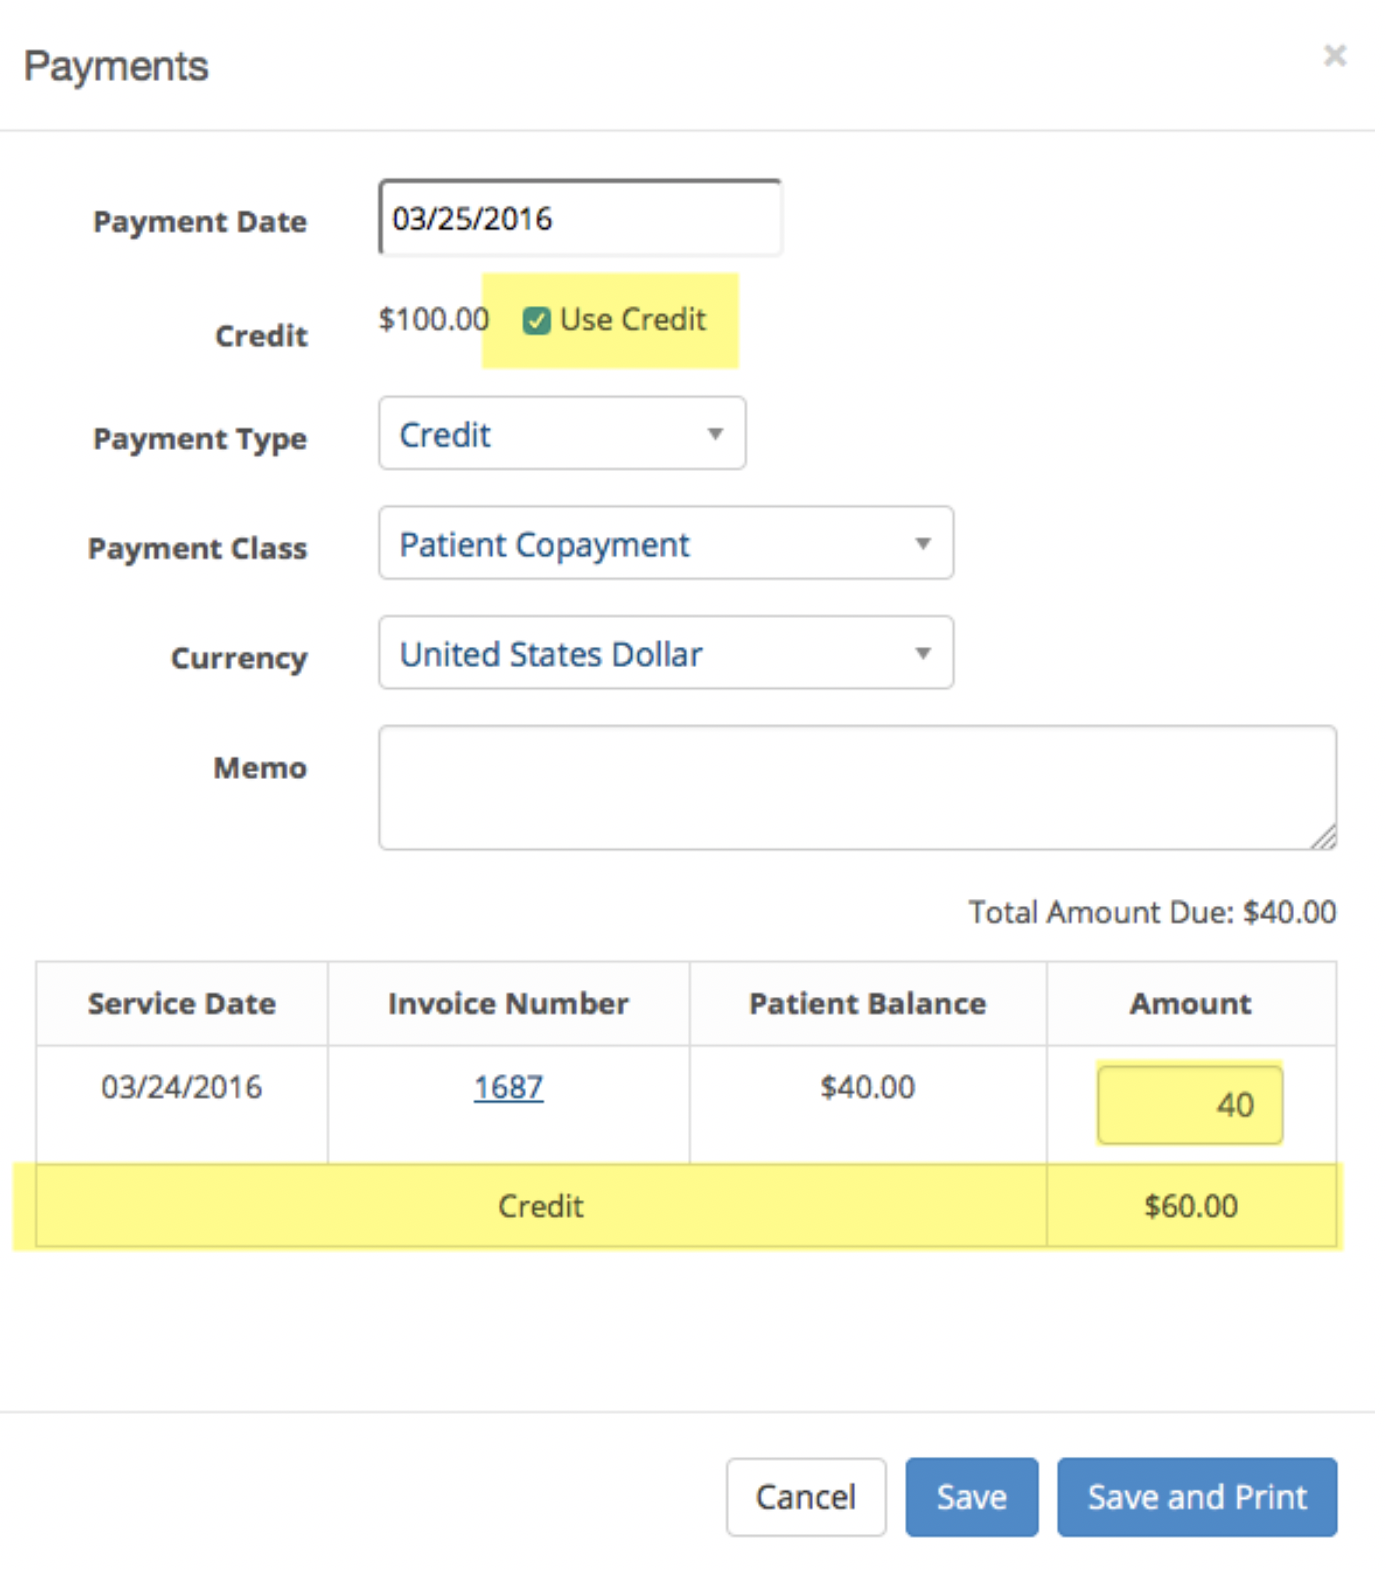
To use the credit click the Use Credit check box. The amount owed will automatically be deducted from the available credit, in this example; the client has a $100.00 credit but only owes $40.00. With the Use Credit check box checked, $40.00 of the credit is applied to Invoice No. 1687 and the remaining $60.00 remains as a credit towards future services. See below.
Scenario #2
The client owes more than the available credit. We want to apply whatever credit there is and record additional dollar amounts to pay the balance. First we check the Use Credit check box. This applies the $60.00 credit towards Invoice No. 1688. That leaves $340.00 owing.
The client owes more than the available credit. We want to apply whatever credit there is and record additional dollar amounts to pay the balance. First we check the Use Credit check box. This applies the $60.00 credit towards Invoice No. 1688. That leaves $340.00 owing.
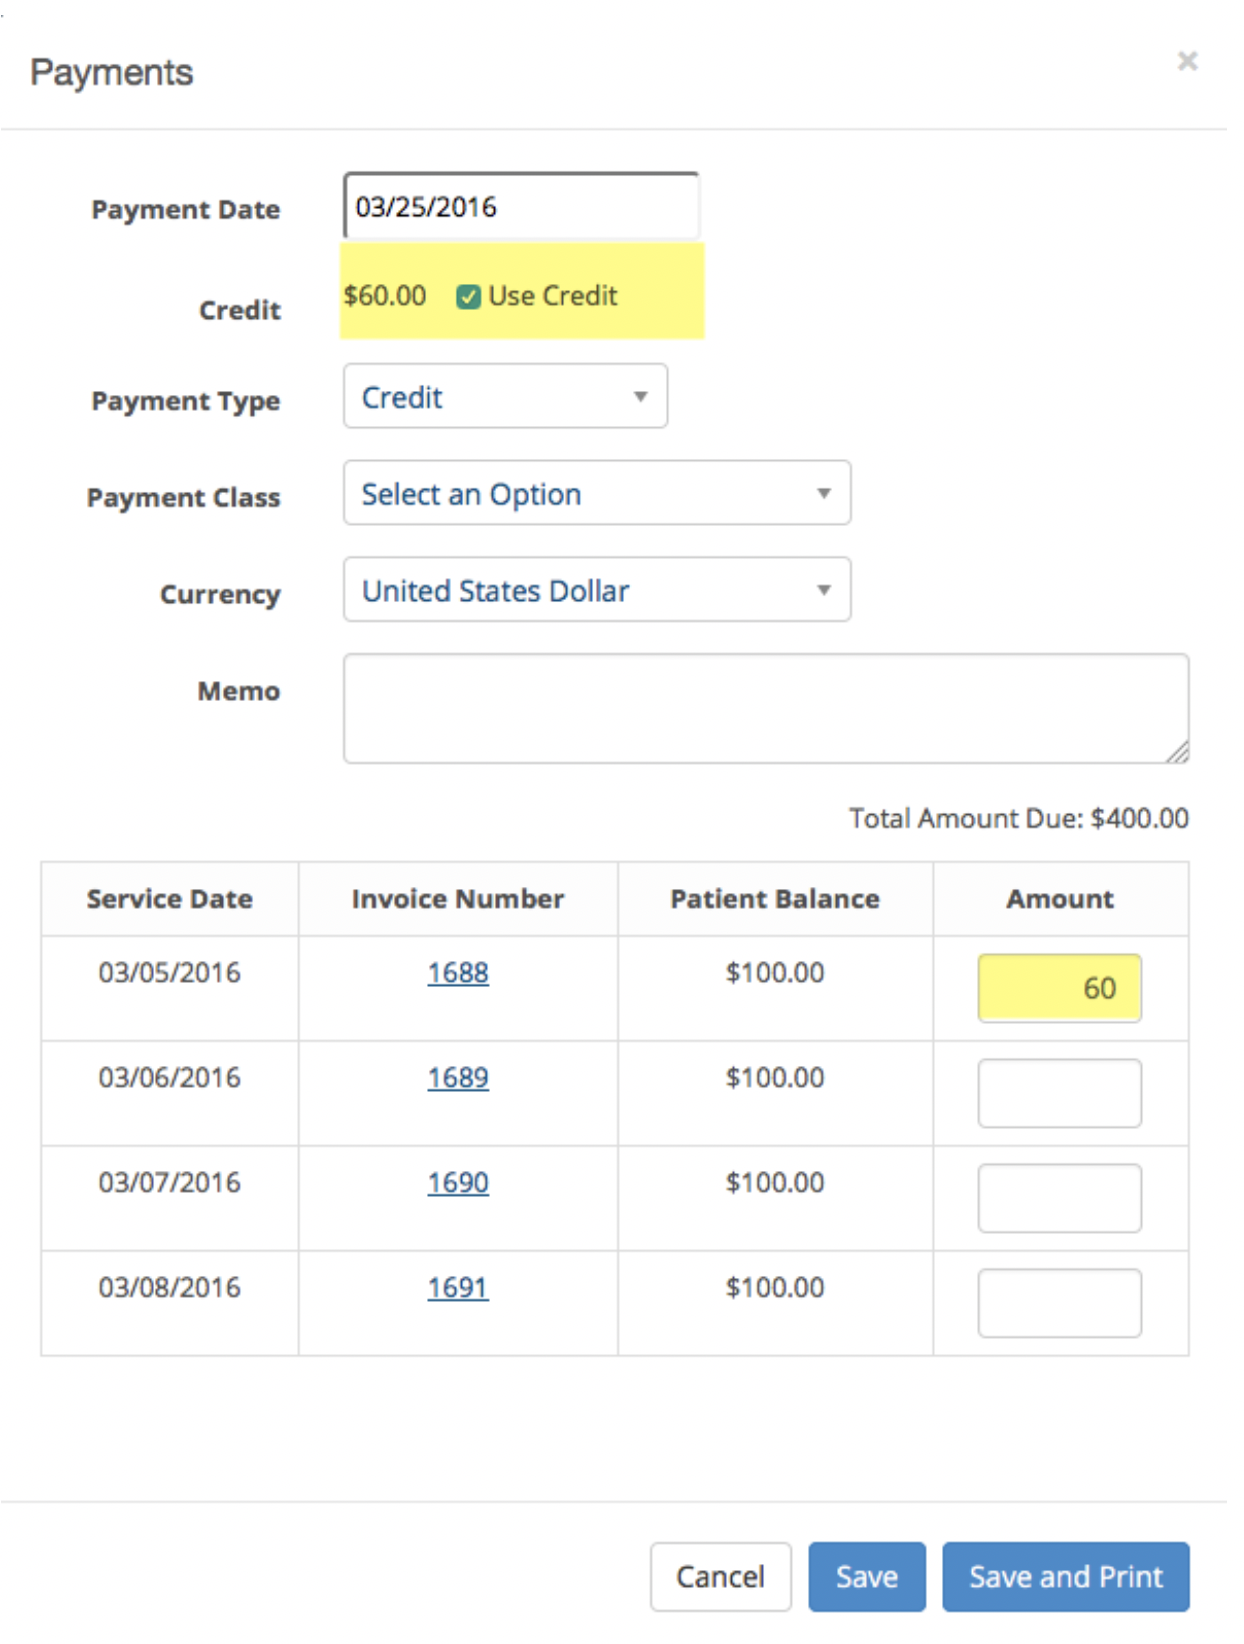
Next we want to apply additional funds to pay off the remaining balance of $340.00. To do this select the additional form of payment from the Payment Type dropdown, select the Payment Class and enter the dollar amount. In the example below, you can see that both the credit and the check payment will be applied to bring the patient’s account current.

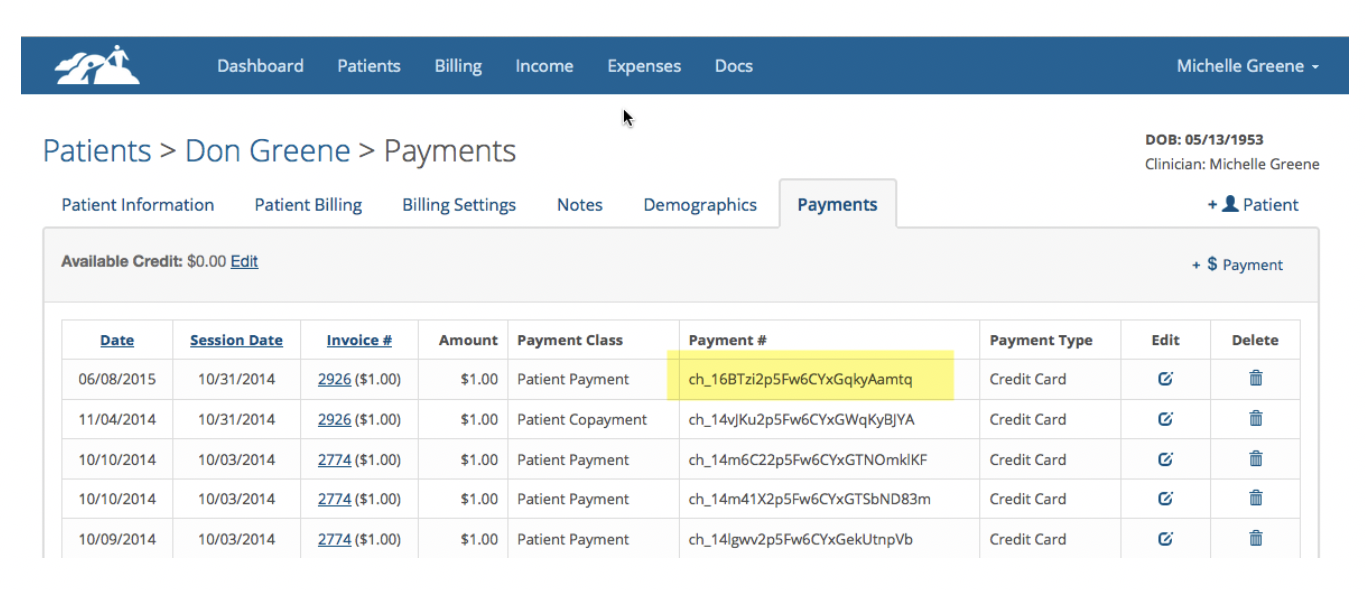
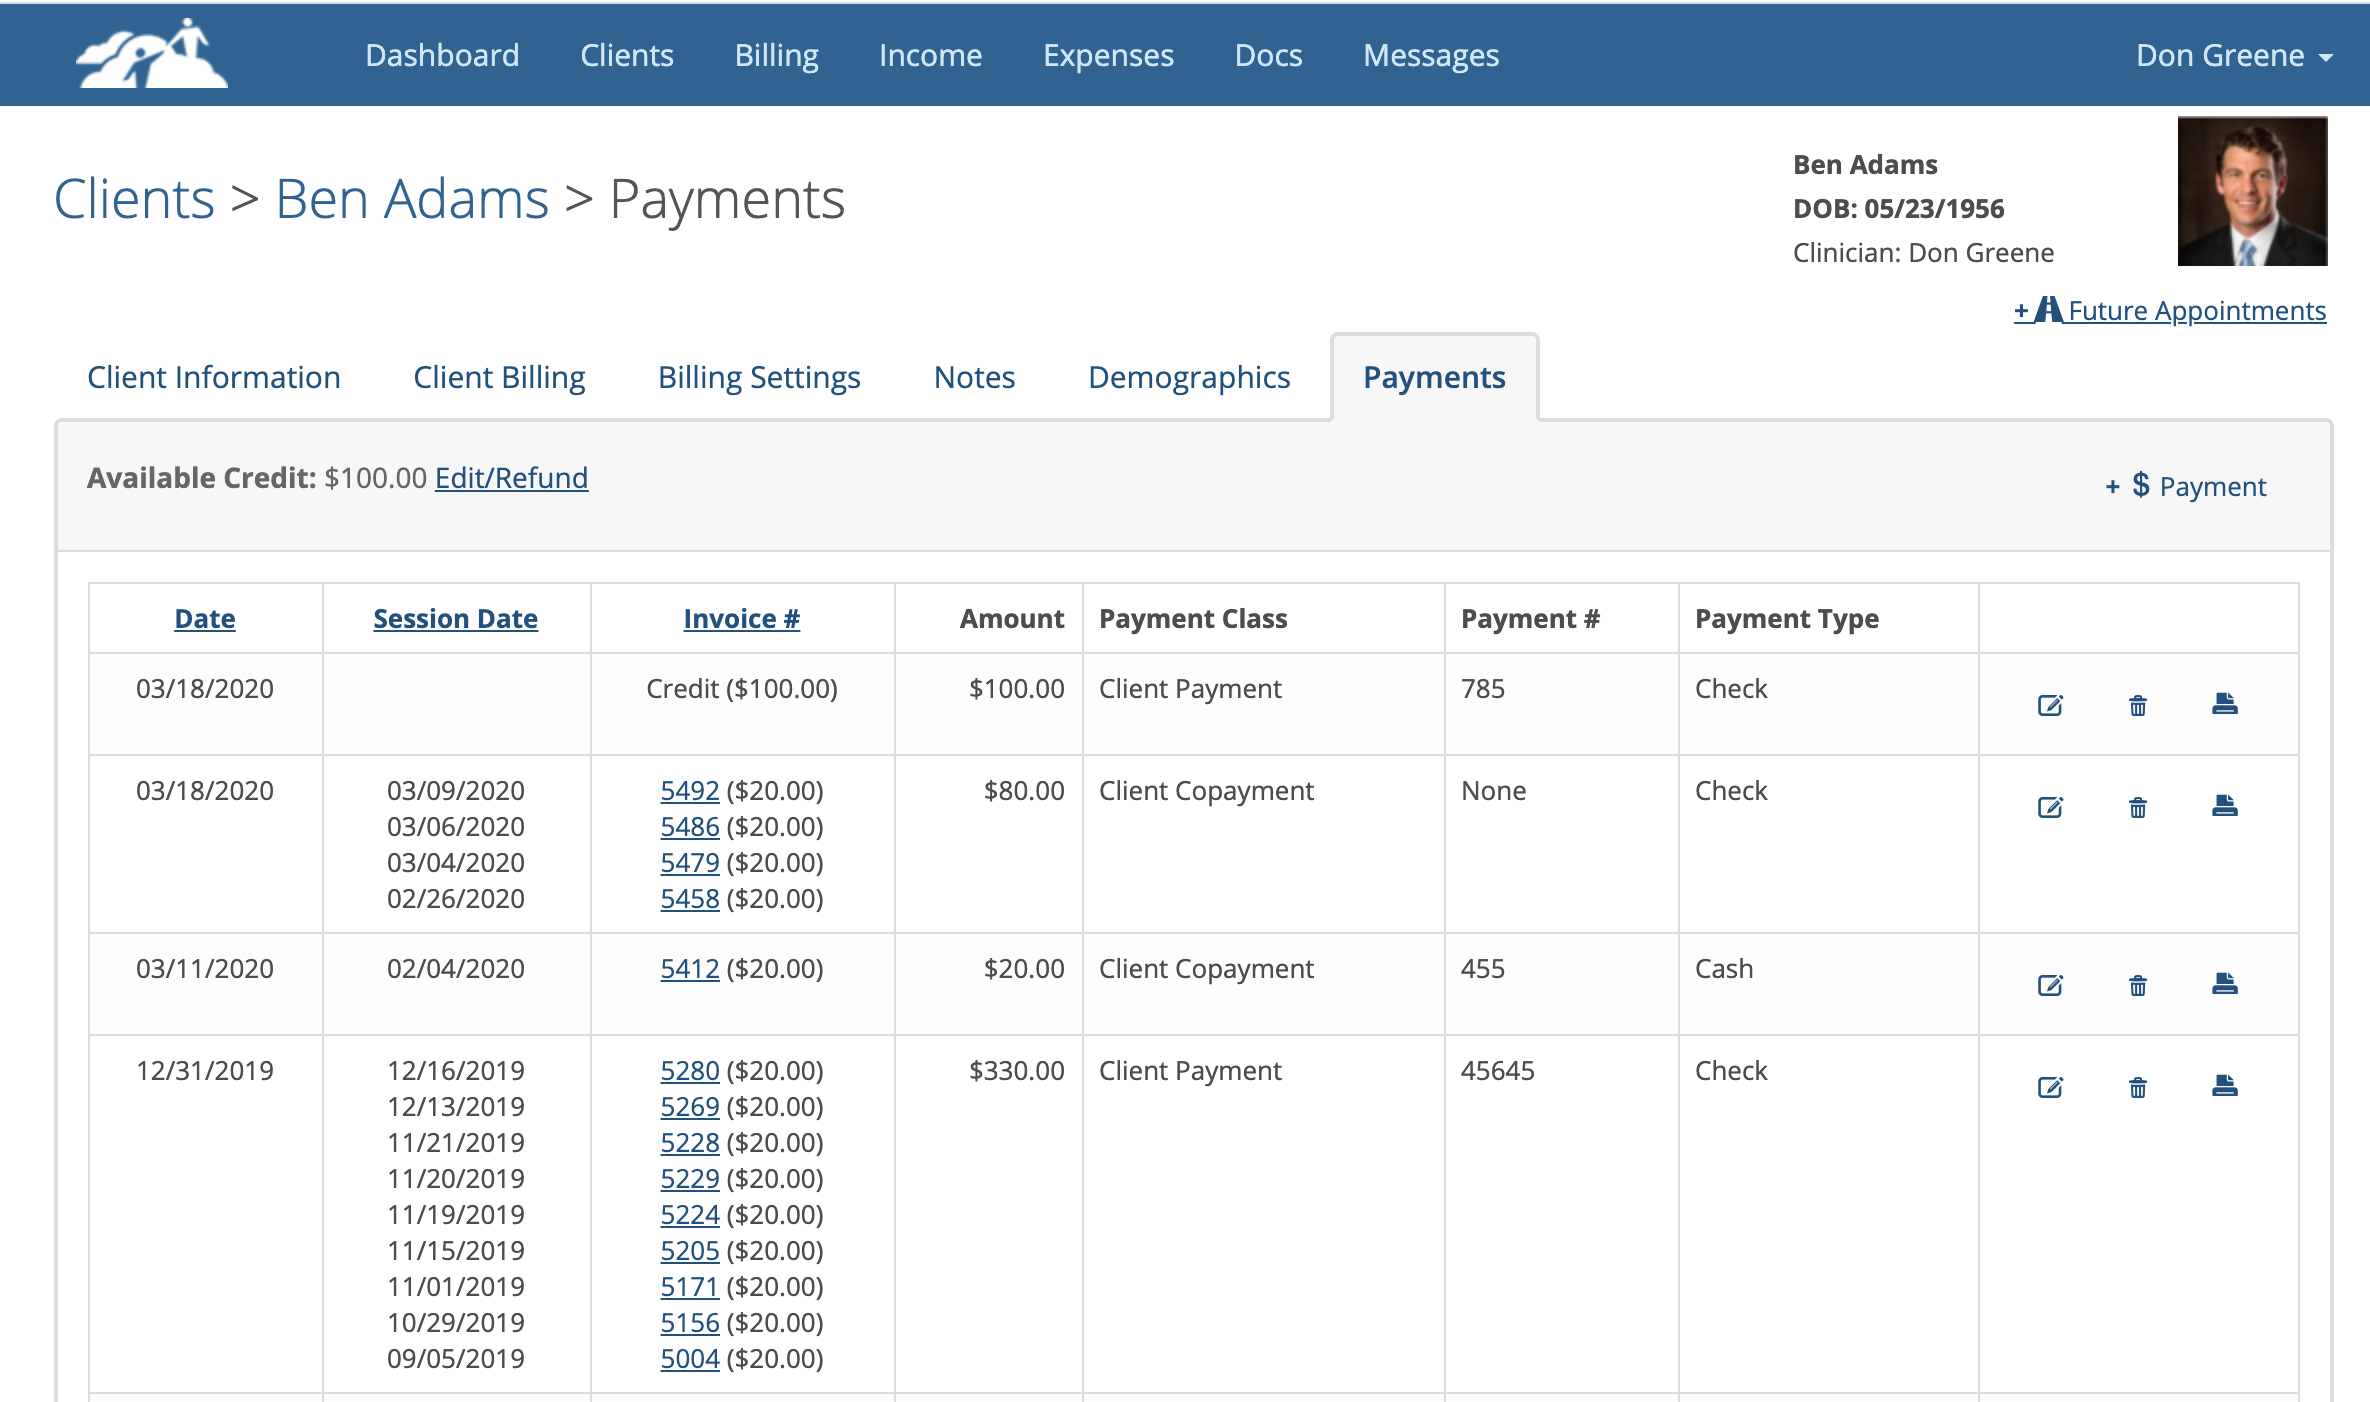
All of the payments you record for a client are recorded and saved on the client’s payment page. The page will show when a payment is made using cash, check, and credit card or when a credit is recorded and used.
Credit Card Payments
There are two ways to take credit card payments. You can use your own credit card processor (ex. Square, PayPal, QuickBooks) or you can use our integrated credit card processor Stripe.
External Credit Card Processing
If you’re using your own credit card processing company, fill out the payment window as shown below:
There are two ways to take credit card payments. You can use your own credit card processor (ex. Square, PayPal, QuickBooks) or you can use our integrated credit card processor Stripe.
External Credit Card Processing
If you’re using your own credit card processing company, fill out the payment window as shown below:
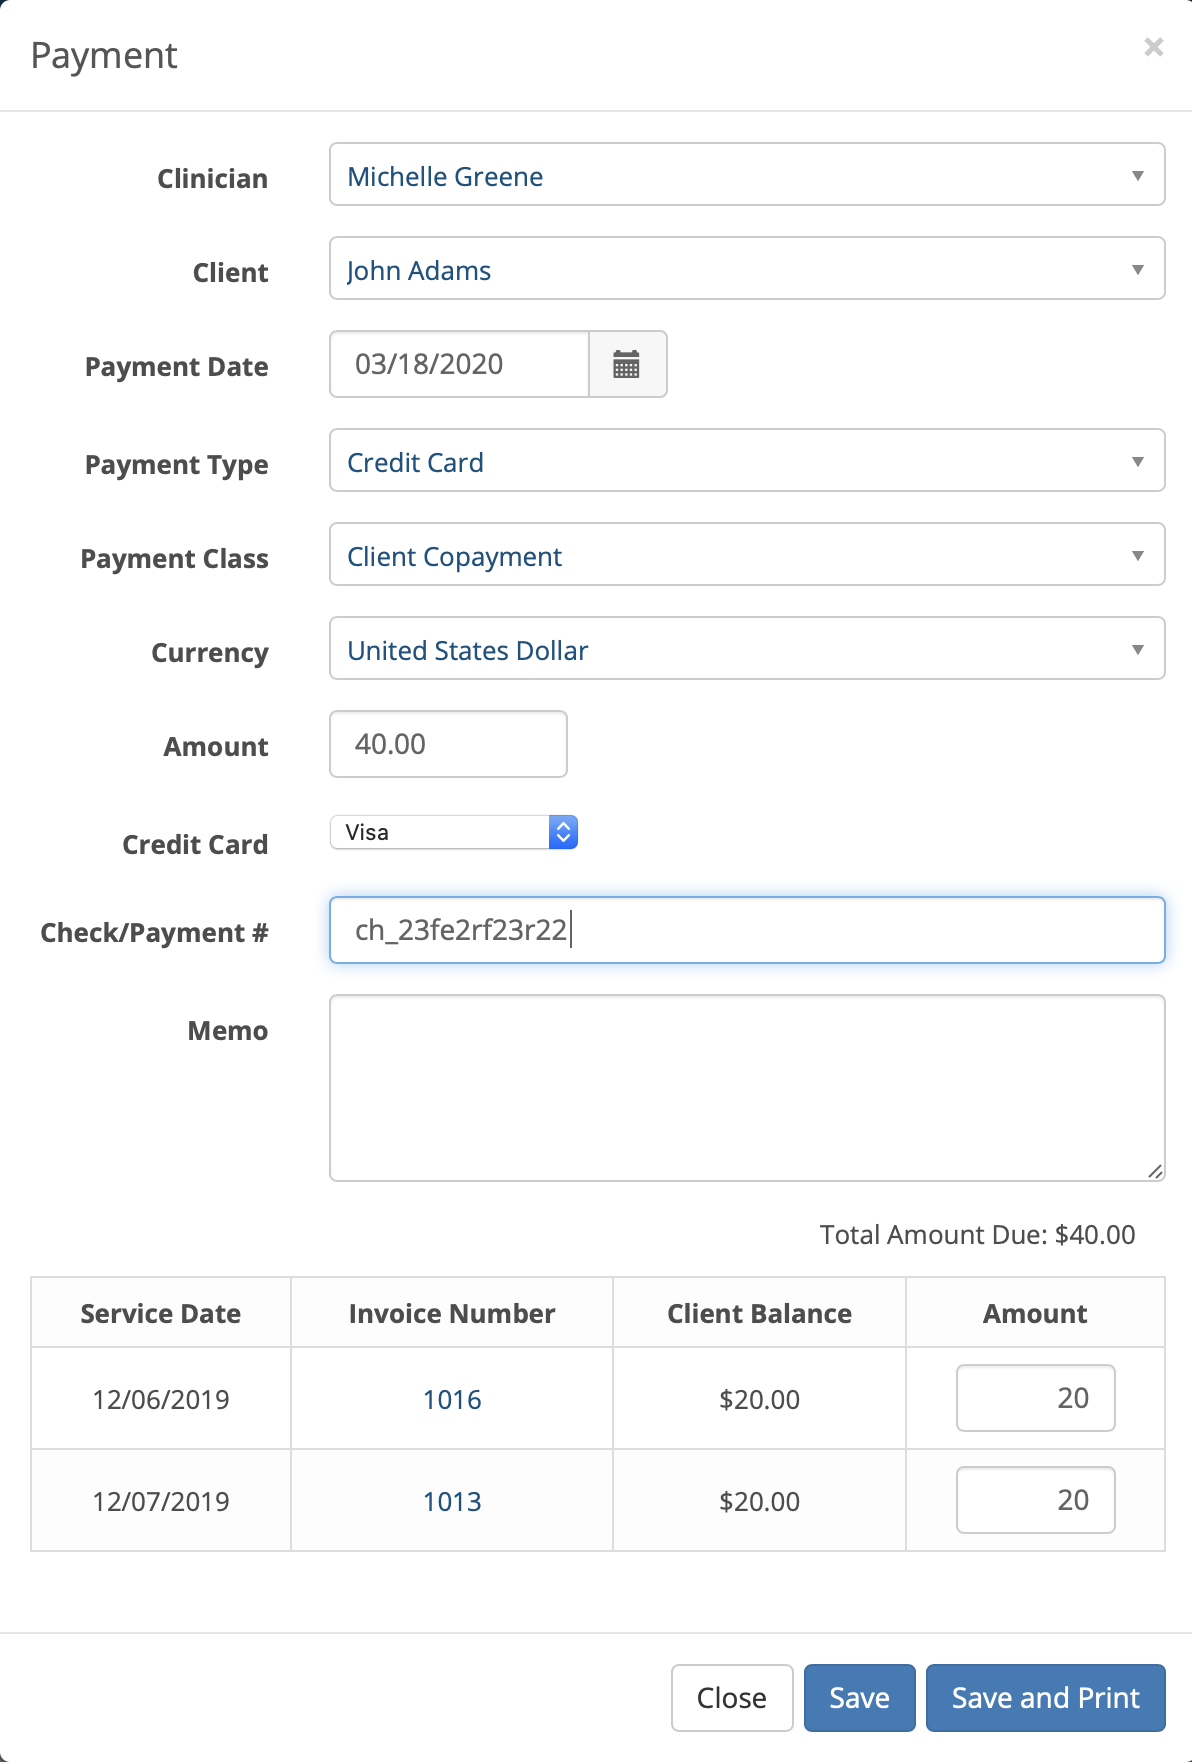
Enter the authorization you get from your credit card processor in the Check/Payment # field. If you forget to do this, you can always go back and edit the payment on the client’s Payment tab.
Click one of the save buttons to record the credit card payment.
Internal Credit Card Processing (Stripe)
Our integrated credit card process is Stripe (www.stripe.com).
Click one of the save buttons to record the credit card payment.
Internal Credit Card Processing (Stripe)
Our integrated credit card process is Stripe (www.stripe.com).
Before you can process credit card payments through Stripe, you must perform the setup process to connect your TherapyMate subscription to Stripe. See the training documentation and follow the steps to setup an account with Stripe and connect it to TherapyMate.
When you complete the setup process to accept credit card payments using Stripe you’re ready to record credit card payments in TherapyMate in a much more efficient manner.
If the patient doesn’t have a credit card on file, you will be asked to input the credit card number and other information. You only have to do this once for each patient if you check the box next to Save Card (highlighted below). The address should be the physical address that is associated with the credit card from the bank's perspective.

You can keep more than one credit card on-file for a client. For example, you might keep their HSA credit card on file and a debit card to pay for missed appointment fees.
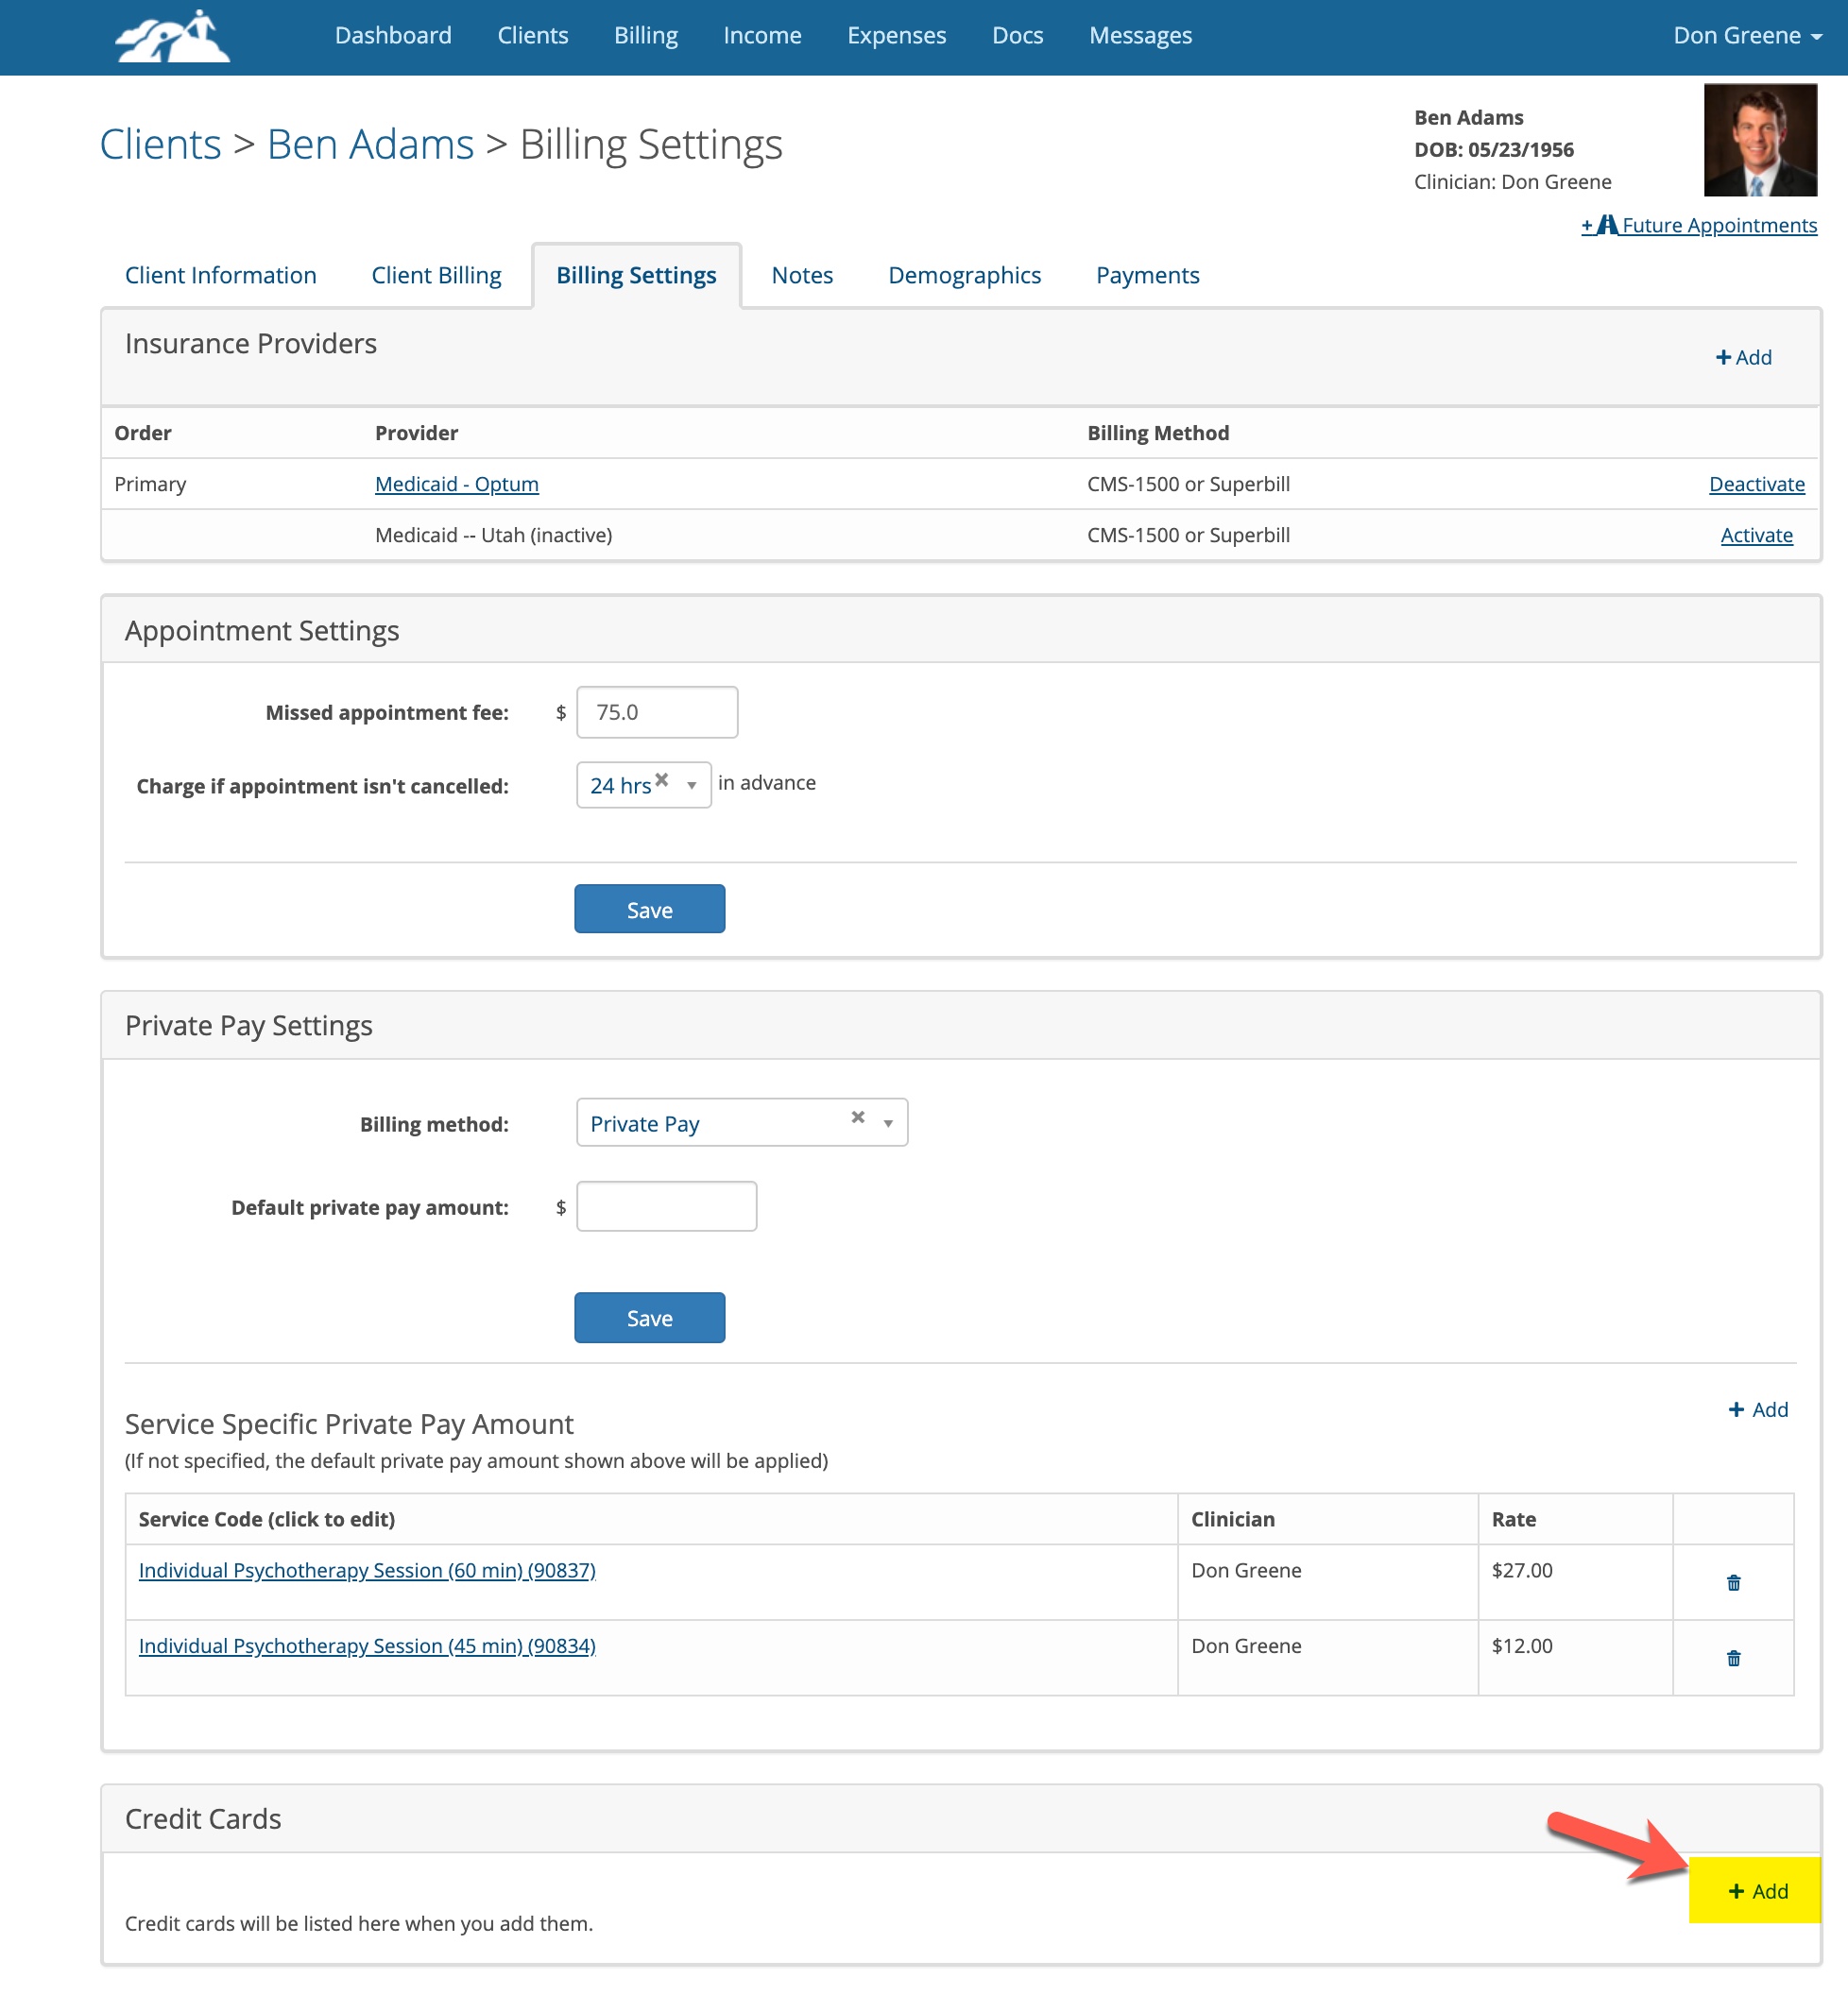
You can also enter credit information on the client's Billing Settings page.
You can also enter credit information on the client's Billing Settings page.
If the client has a credit card on file already, the window will look something like the following example:
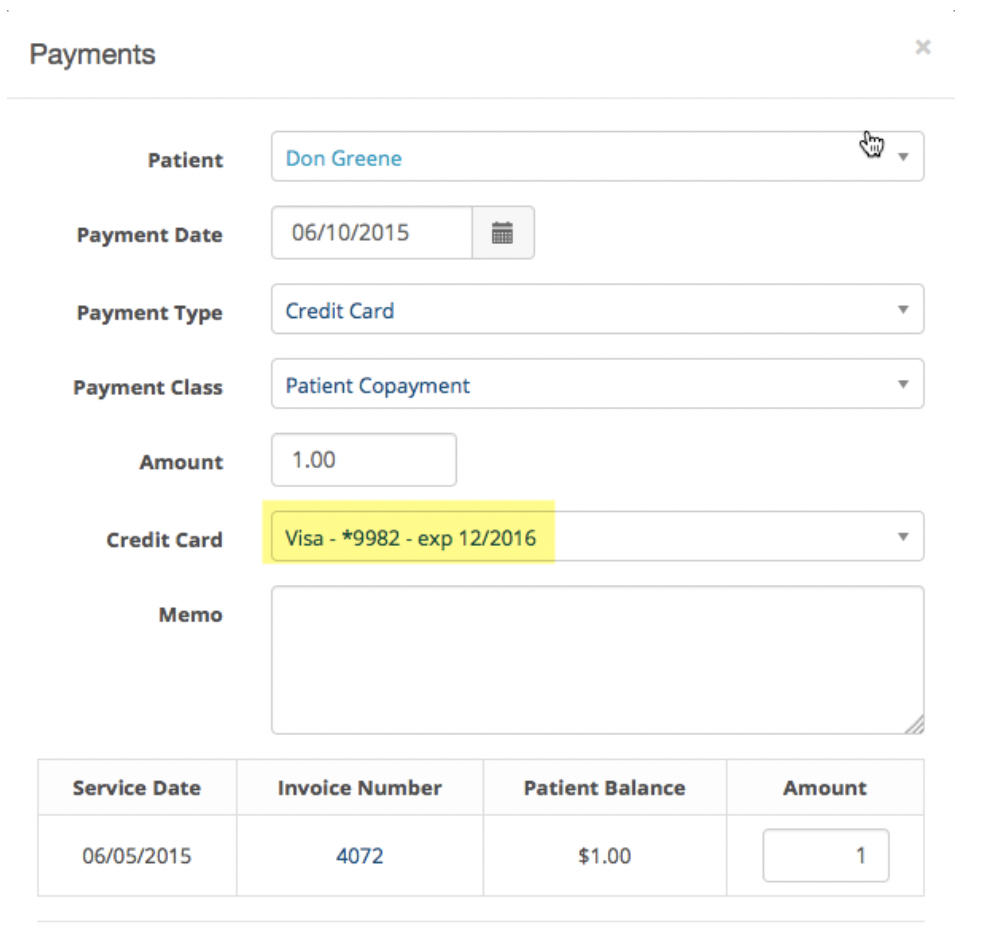
The credit card that is on file is shown in the Credit Card field in a secure abbreviated format. Each client can have one or many credit cards on file. You can select a different card from the Credit Card field drop down when you want to use one of them. When you submit the credit card payment, the authorization number is automatically added to the client’s payment page. Using your own credit card processor requires you to enter it manually each time.
See the example below:
See the example below: