The Practice System Administrator chooses these settings in advance and will be used for all clinician's in the Practice. Be sure that each clinician has their work hours settings set properly so clients can only see the desired time slots that are available for each. If a clinician doesn’t want certain time slots available within their work hours settings, they should create Calendar Events to block them out. If a time slot is taken, the client will see "Unavailable".
When a client creates an appointment with this method, the appointment immediately appears on the client's portal schedule and on the clinician's dashboard/schedule.
Here are some important things to note:
1. The service code used for the appointment will automatically default to whatever the clinician has designated in their clinician service code settings. The client will not be able to pick a service code.
2. The service locations shown on the client's appointment creation window will show "No Location Set" unless the clinician has set a default for each day of the week in their Clinician Work Hours settings. See example below.
Both the service location and service code can be corrected later by the clinician or staff member later if needed.
3. If a client later cancels their appointment, the appointment will be marked missed on the clinician's schedule.
Client Self Scheduling Requiring Clinician or Staff Approval
This method allows client to login to the client portal and request an appointment. An appointment request must be approved by the clinician or admin staff prior to the appointment actually happening. The client must still comply with the settings the Practice has chosen for Clients can book appointments, Limit Booking to, and Clients can book within and if there is an available time slot.
To use this second method, turn on the Enable Appointment Approvals toggle switch. See below.
When this is enabled, you'll notice there is a new section called General Service Locations. The System Administor for the Practice should define some general or generic locations that clients can choose when they schedule an appointment. For example, the client may wish to be seen in the Heber City office, but within the Service Locations settings for the Practice they might have Office 1, Office 2, Office 3 for Heber City defined. A client wouldn't know which office to choose, nor would you want them to do that. During the process of approving the request the clinician or admin staff picks the correct location, the appropriate service code and if needed the procedure code modifier to be used before approving the request. Selecting the proper values prior to approval will help ensure the clients appointment including the location, invoicing and billing are set up accurately.
There is an exception to what was described above that you should consider. If the clinician has a specific location for a particular day set, that will override the General Service Locations. For example, If the clinician has the Sandy Office #1 set for Monday, that's what the client will have as their only option on Monday. The Practice should decide if this is allowed. If not, each specific location with the clinician's settings needs to be reset to the "select location" option in the drop down so the General Service Locations will rule.
How Does the Approval Process Work?
When a client requests an appointment the clinician and/or authorized staff member will get notified that a request was made.
The client's calendar will show their request on the day and time specified in a gray color. From their view of point it will say: Appointment Request Waiting for Approval
From the clinician's point of view, the client's request will appear on their dashboard approximately 5 minutes or less after the client creates the request. The client's request puts a placeholder on the clinician's schedule in gray. Here is an example:
It is now necessary for the clinician or admin staff to approve or reject the request. This can be done in one of two ways. Notice the two areas highlighted by the red arrows where this can be done.
- Click on the grey are on the appointment on the clinician's schedule to open the edit appointment window.
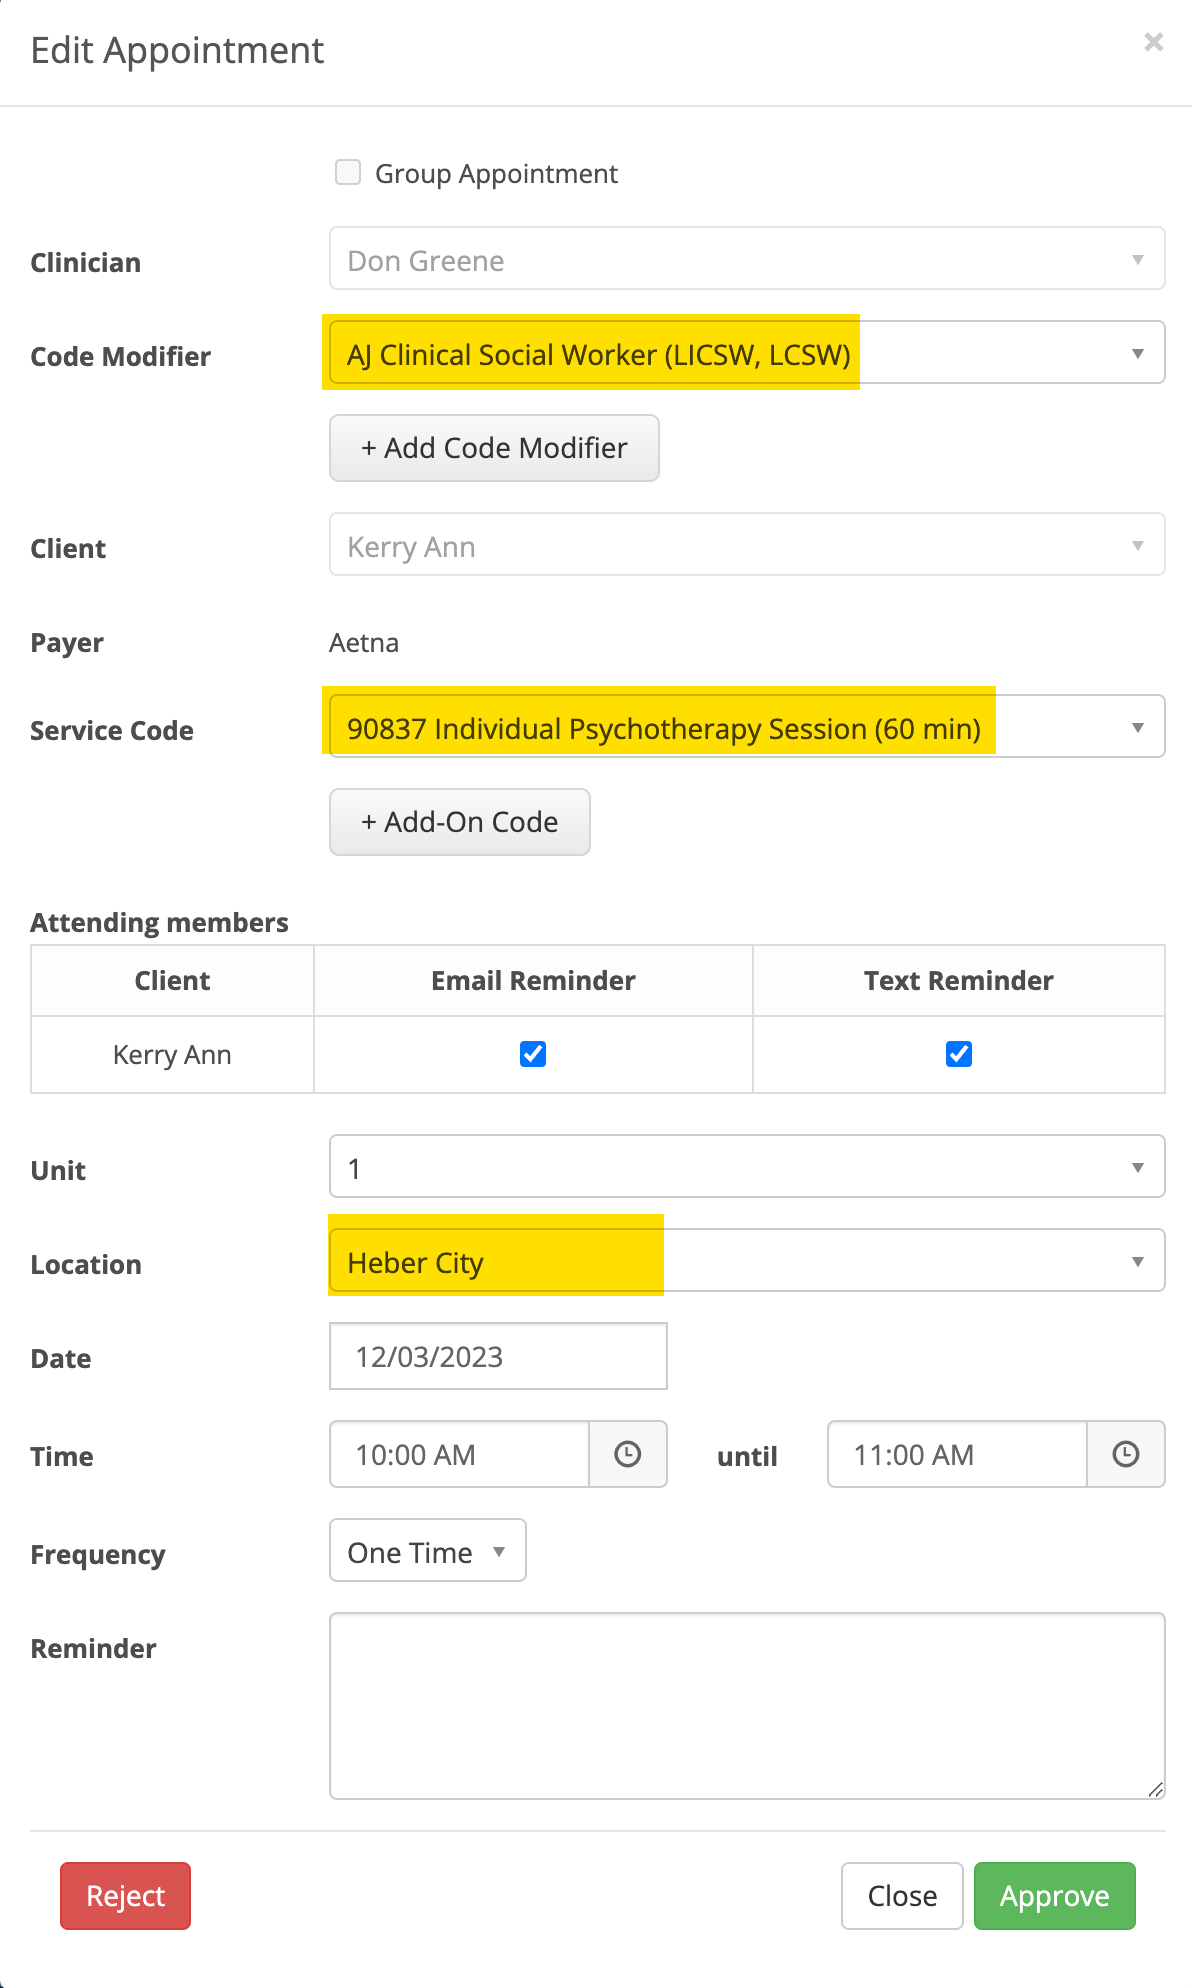
Choose the correct service code and location. The Code Modifier is optional. Then click the Approve button. The client will get an email letting them know the appointment was approved and the gray appointment placeholders will change to the normal light green color.
2. Click on the Action menu item called +Appointment Requests. Notice there is a red number next to it indicating there are two appointment requests waiting to be reviewed.
On the Appointment Requests screen you will see all of the requests that need approval. There is an Approve or Reject button on the right side.
Before can approval can be done, The location and service code need to be selected. The procedure code modifier is optional.

Then click the Approve button. The client will get an email letting them know the appointment was approved and the gray appointment placeholder on the clinician's and client's schedule will change to the normal light green color. If the client is set up for text reminders, they will also receive a text telling them it is approved.
In either method if the appointment is rejected, the client gets an email telling them it wasn't approved and to call their clinician or the clinic for assistance. If the client is set up for text reminders, they will also receive a text telling them it isn't approved.
Who can approve appointment requests?
The system administrator, assistant system administrator, clinical director, scheduler can all approve a request. There is a role that needs to be enable to make that possible. This is done via the Staff page. The following is located in the lower right hand corner of a person's User Settings page.
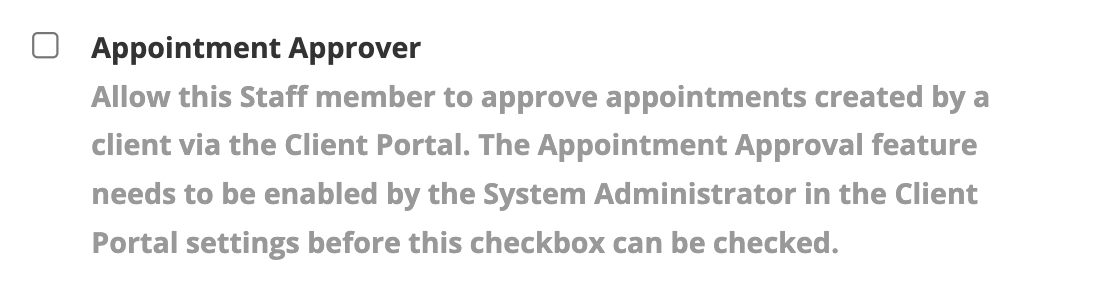
The System Administrator for the Practice has rights to check the box to enable a staff member to approve appointment requests.
When a person has rights to approve requests, they will get notified that a request has been made. Approving a request is the same as was mentioned above.
What happens when a Client Cancels an Appointment?
A client can cancel their appointment via the client portal. When this happens the client is prompted to create a missed appointment note. This note requires them to give a reason for the cancelation. This note is saved in the client's chart with all the other notes. The staff members who are approvers will get notified when this occurs.
Time Zone Differences
The time zone setting in a Clinician's settings and the time zone on the Client's Information page are important to allow both parties to see the appointments at the correct time. If you have a client who is NOT in your same time zone, be sure to set their time zone setting to the zone they reside in.