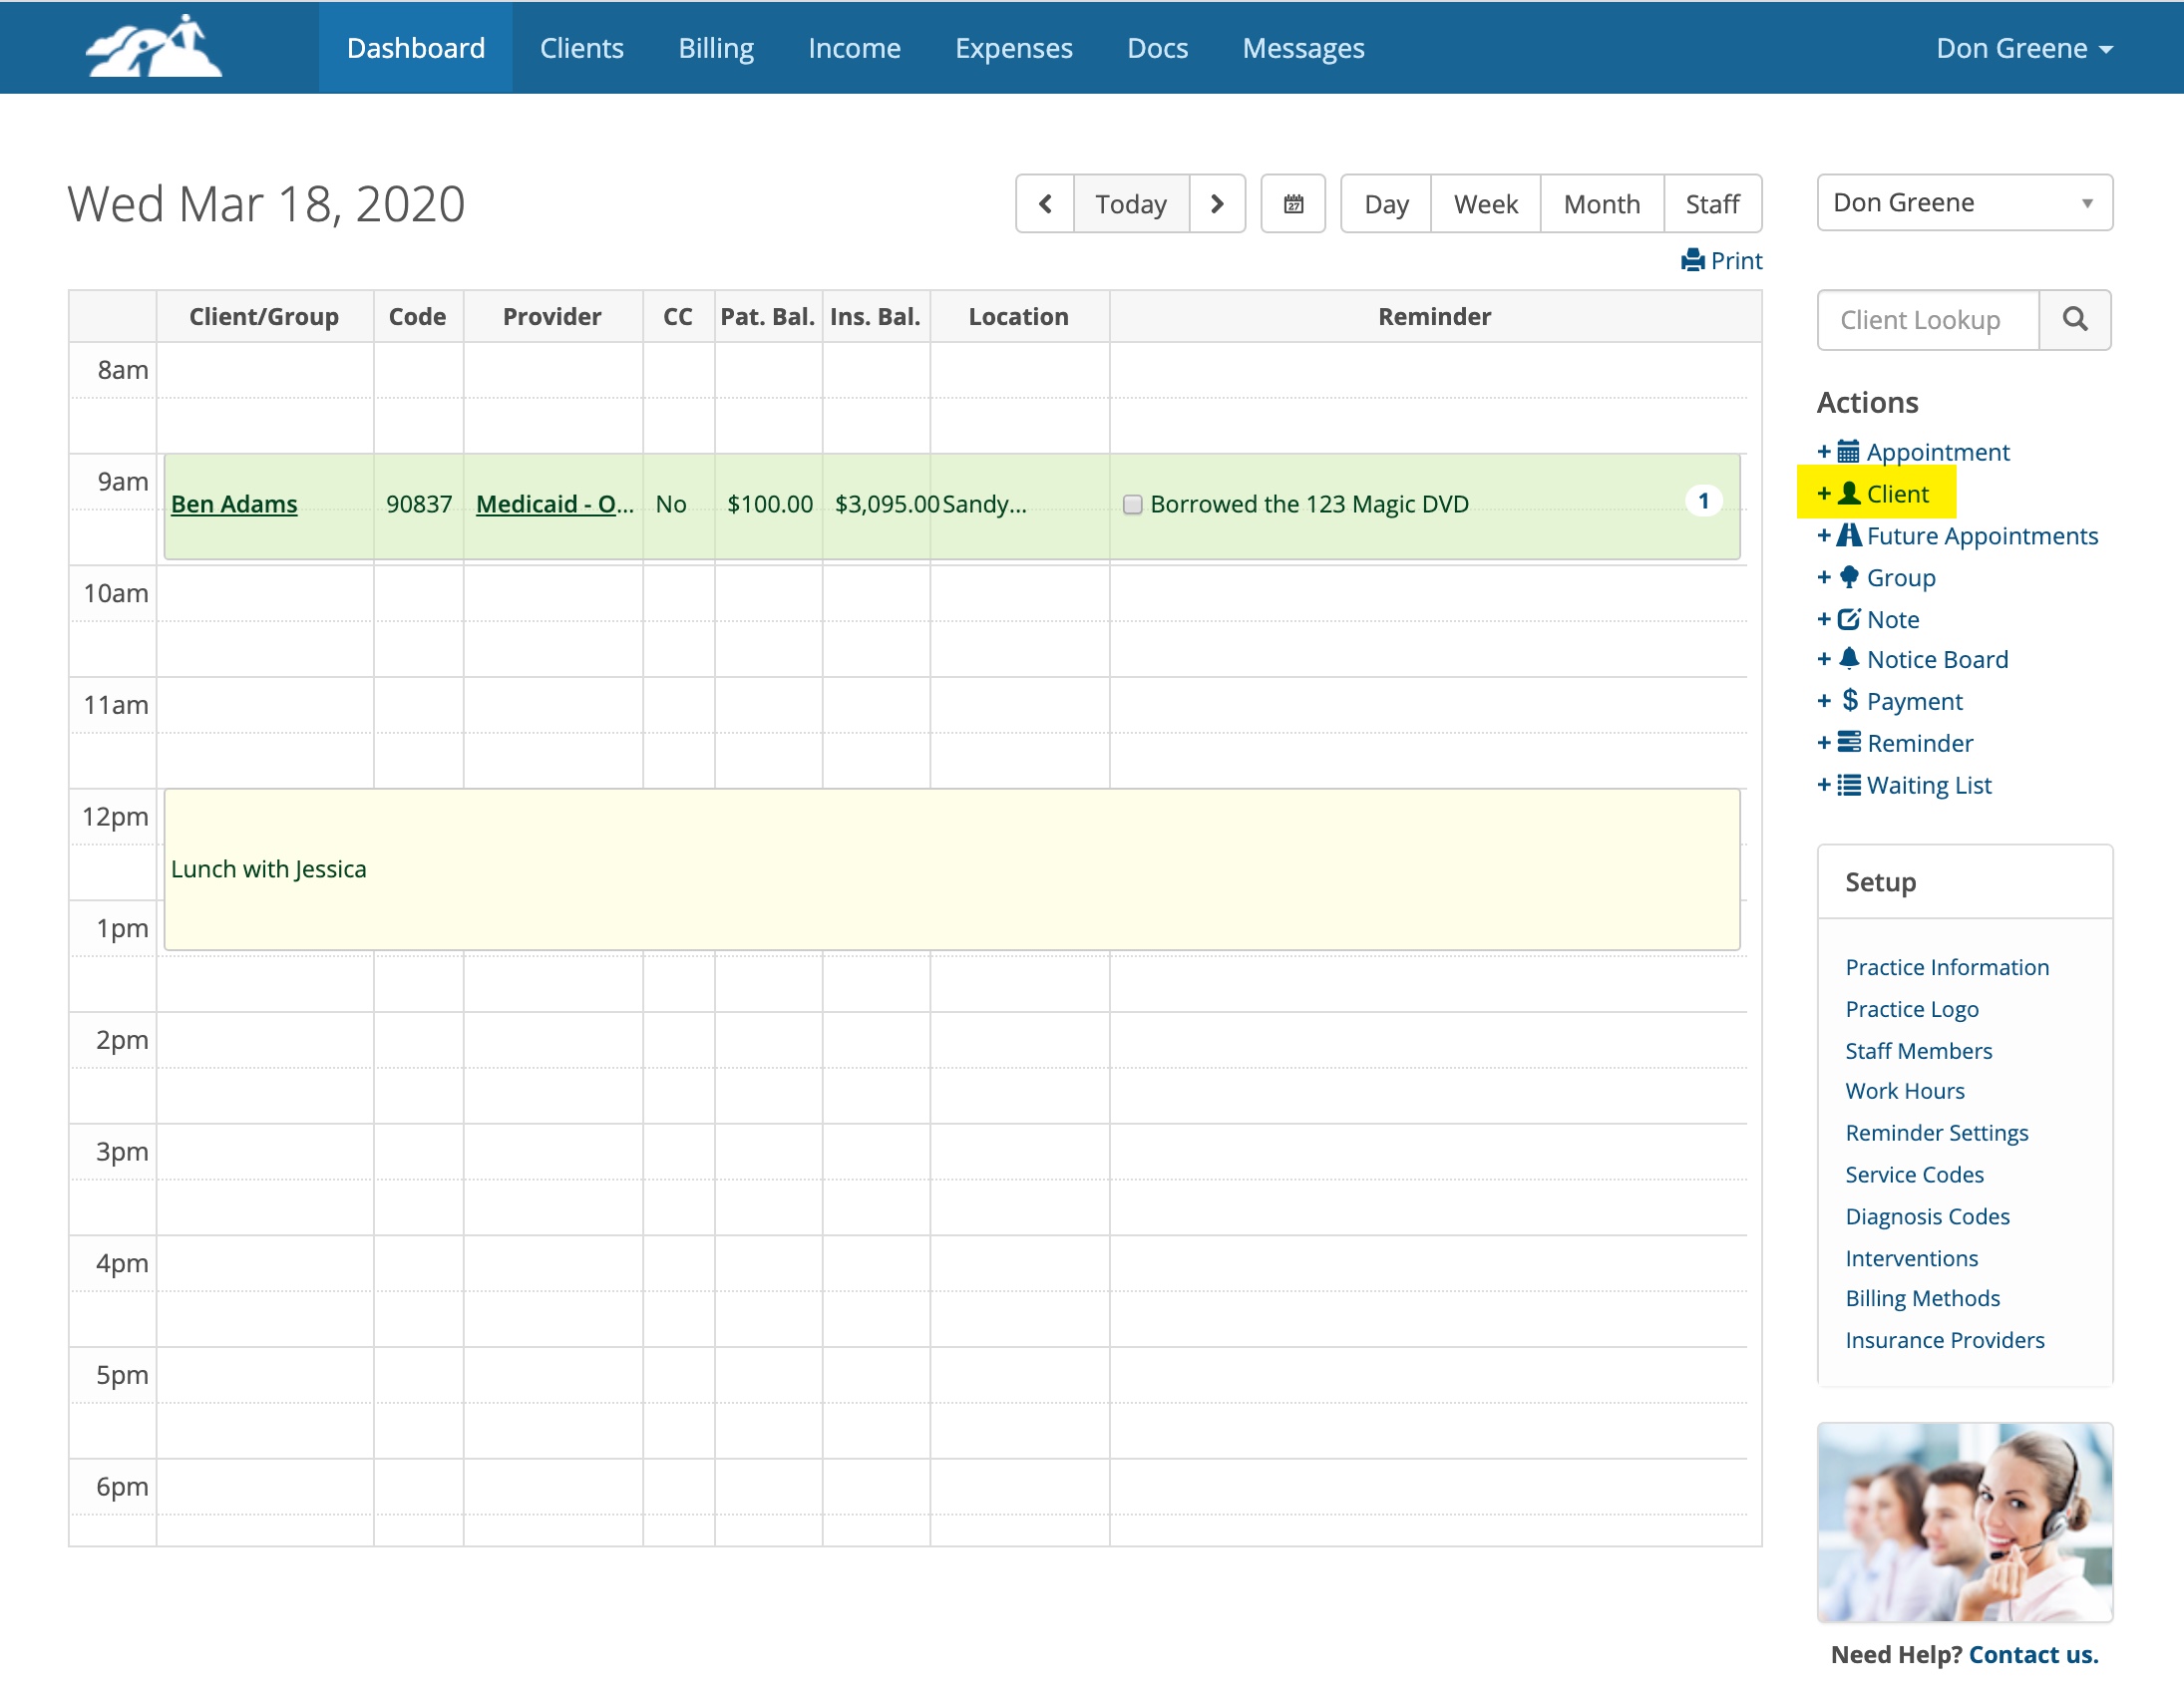
Add a new client to your client list by clicking on +Client in the Actions Menu on the Dashboard.
When adding a new client there are three things you must do before scheduling the client.
- Assign a Clinician.
- Fill out the Client's Information Page. For billing purposed the following are required:
- Legal Name, First and Last
- Address Line 1
- City, State, Postal Code
- Date of Birth
- Sex
- Email Address (for client portal invitations)
- Set the Time Zone to where the client is located. It will default to the Practice time zone.
- For text appointment reminders enter a Mobile Phone number and change the drop down to the right to Text or Text & Voice Mail Messages.
- For email appointment reminders enter the client's desired email address in the Reminder Email(s) box and check the checkbox to enable them.
- Configure the Client's Billing Settings
- Add an insurance provider if the client is using Insurance
- Add a default private pay amount if the client is paying out of pocket.
- Don't add an insurance provider AND private pay amount. It is either one or the other.
- Add a missed appointment fee if applicable and se the number of hours in advance drop down.
Client Information Page
The highlighted fields are recommended. The other items are optional for billing purpose. Add the other items as desired.
The highlighted fields are recommended. The other items are optional for billing purpose. Add the other items as desired.
The Client Number and Portal User Name will be filled in automatically when you click the Add button to save the client's information and the client's portal username will be selected by the client themselves. Please don't change the numbers in these boxes.
Appointment Reminders and Notifications
If you want to send email appointment reminders enter the client's email address in the box labeled Reminder Emails(s). Also check the box next to Reminder Email(s) to enable the reminders.
You can enter more than one email address in this box if you separate them with a comma so the reminders go to two different email addresses.
If you want to send text appointment reminders enter the client's mobile phone number and change the drop down from No Messages to Text Messages or Text & Voice Messages.
Client Portal Invitation (Optional)
When you click the Add button to save the new client's information the Client Portal Invitation window will appear. Here is an example:
Client Portal Invitation (Optional)
When you click the Add button to save the new client's information the Client Portal Invitation window will appear. Here is an example:
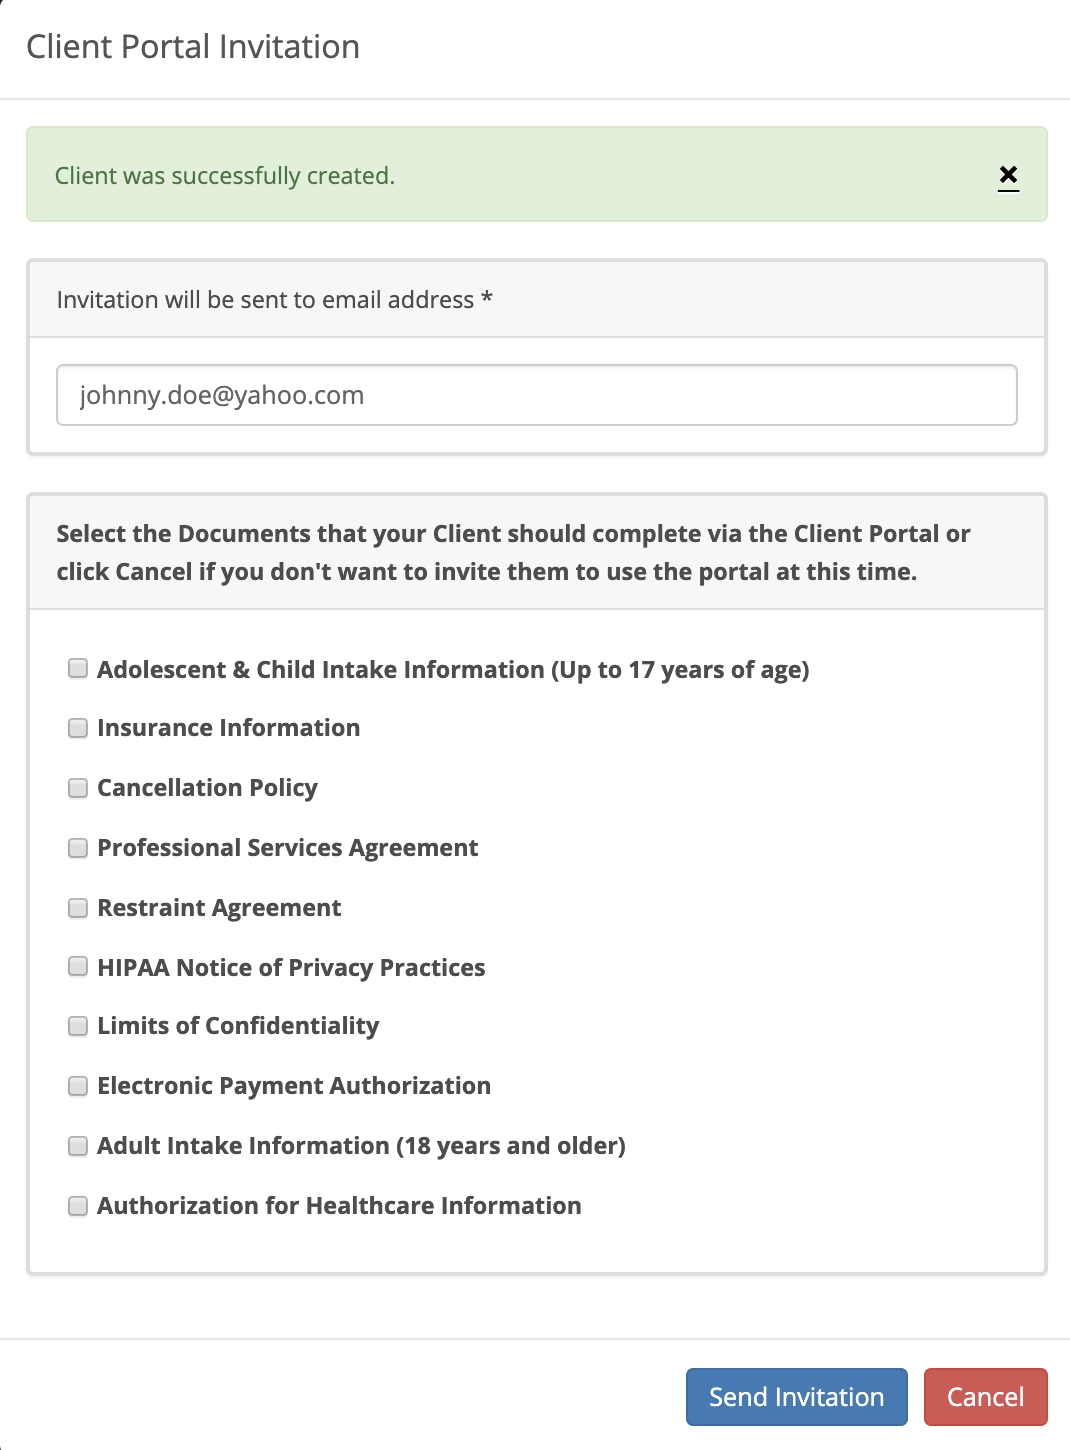
If you want to bypass sending the portal invitation at this time, click the Cancel button. The client's information will still be saved to their client information page. You can always send an invitation later.
Important: If the Practice is going to use the portal, the System Administrator for the Practice needs to configure the Client Portal Settings and create, edit and customize the list of document and questionnaires before they get sent to a client. There are several training articles in the Help Center in the Client Portal category to help you do this. You must configure this feature before sending Client Portal invitations.
Client Billing Settings
The third tab over in the client's chart is called Billing Settings. CONFIGURE THIS PAGE BEFORE SCHEDULING THE CLIENT. This page is important because it will define how the client's appointments will be billed. Changing the billing settings after appointments have already been scheduled will not be retroactive, but will apply to any new appointments.
You have two choices, bill the client (Private Pay) or bill the client's insurance company(s).

On the client's Billing Settings page you will see a configurable area for each one. Configure one or the other, not both. The client either has insurance or they don't. Lets talk about clients with insurance first.
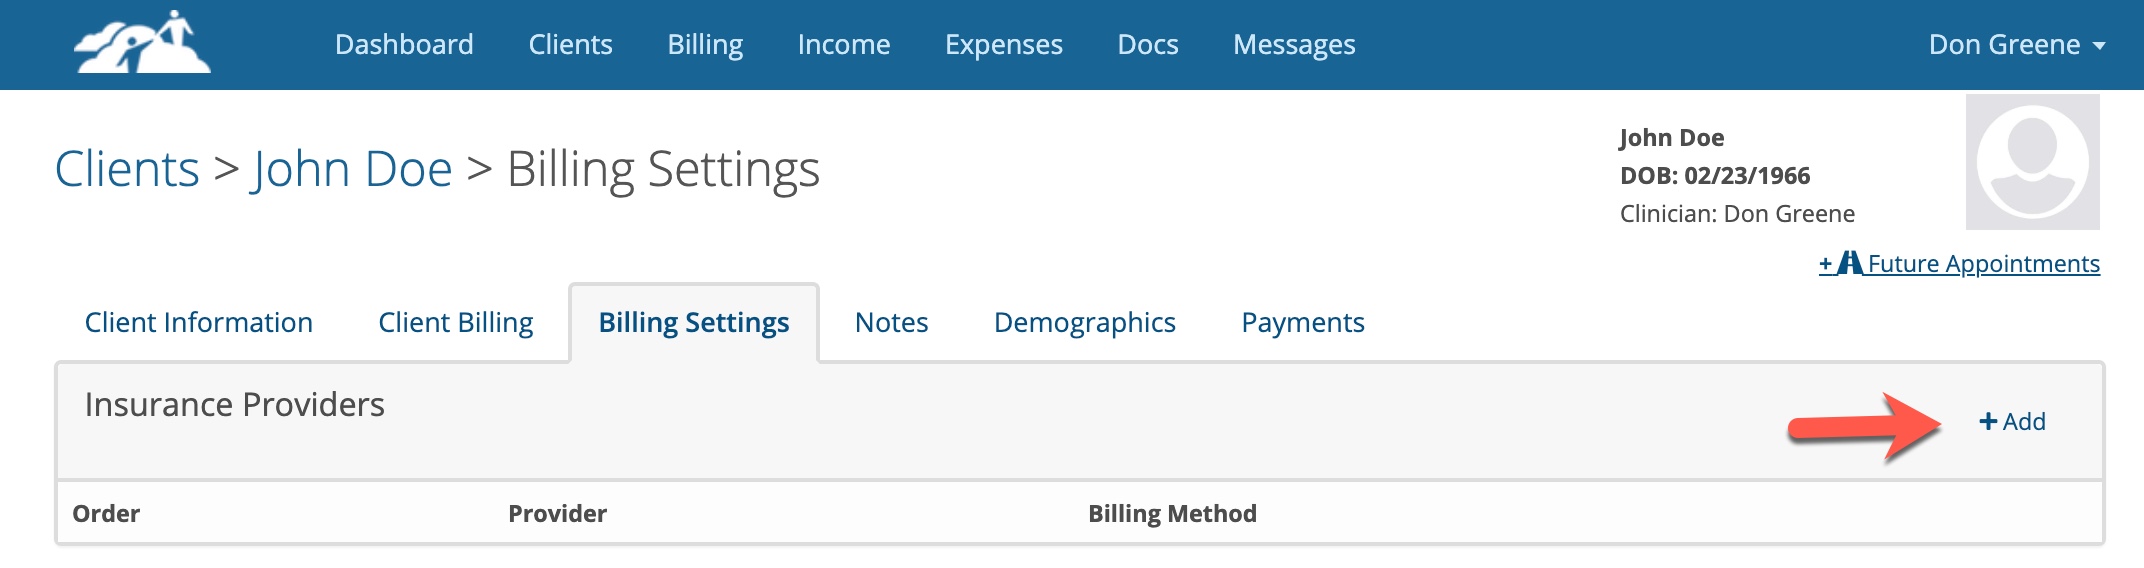
Insurance Providers
Before you can add an insurance provider to a client's chart, the System Administrator must add the insurance companies the practice's master list of insurance providers. If the desired insurance provider isn't visible in the client's insurance providers settings, contact the System Administrator for your Practice to have it added so everyone can benefit from that.
To add an insurance provider to a client's chart, click on the +Add button in the upper right corner of the Insurance Provider area.
The highlighted area below are important and other area may be optional depending on the circumstances.
- Select the Provider's Name from the drop down. If the insurance provider is not present, contact your System Administrator to have it added.
- Set the Billing Method to desired billing method. Contact your System Administrator if needed for the correct option. For Claim.MD choose Clearinghouse Claims-Direct.
- Enter the amount of the Client's copay if they have one. If their deductible has not been met enter the amount that you are going to collect for each session in the copay box until that happens. The dollar amount entered in this box will automatically be added to the client's invoices on the day of their appointments as a client charge. This can be left blank and updated later if needed.
- Select the Client's Relationship to the Insured. Your options are Self, Spouse, Child or Other. If you choose Self the client's name, address and date of birth will copy over from the Client's information page automatically if you entered it there. If you choose Spouse, Child or Other, you will have to enter this information manually.
- Enter the Insured's ID number. This also called the clients insurance policy number. It is best to get a copy of the client's insurance card to obtain this information to ensure accuracy.
- Not all insurance companies use a Group Number. Leave it blank if they don't
- Leave the "Insured's Insurance Carrier or Plan Name" field blank if desired. It is optional
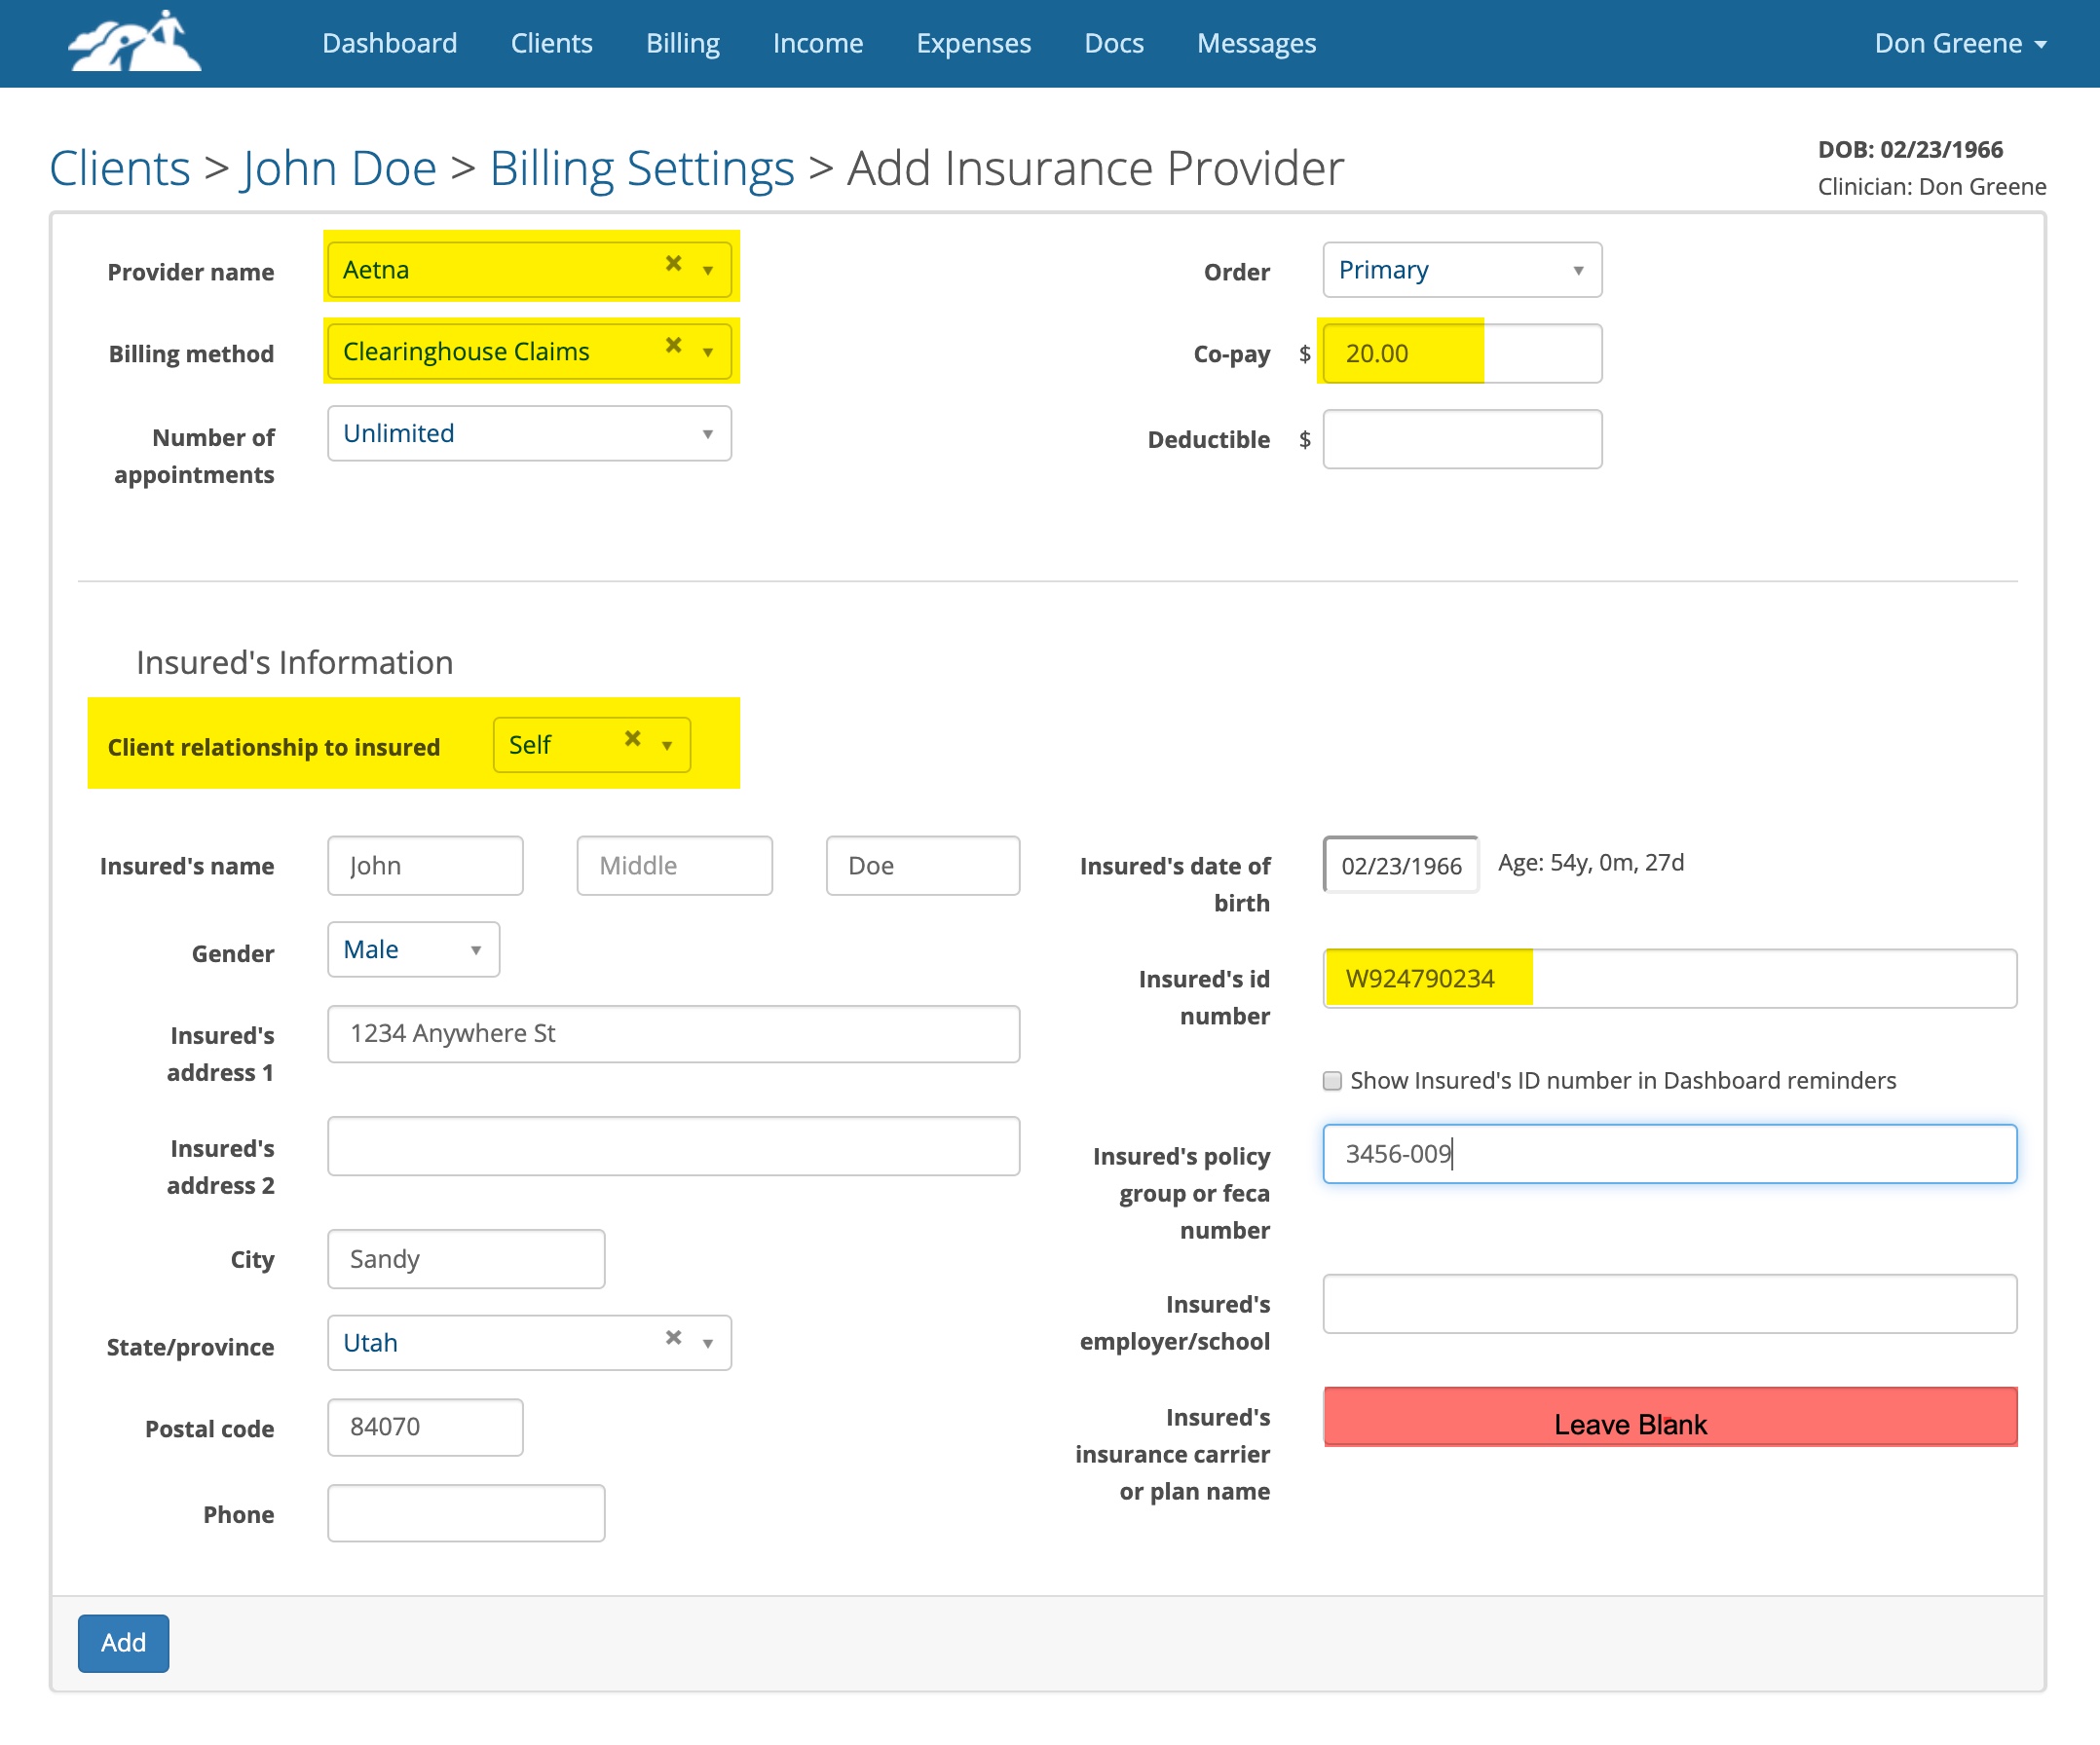
Click the Add button when done.
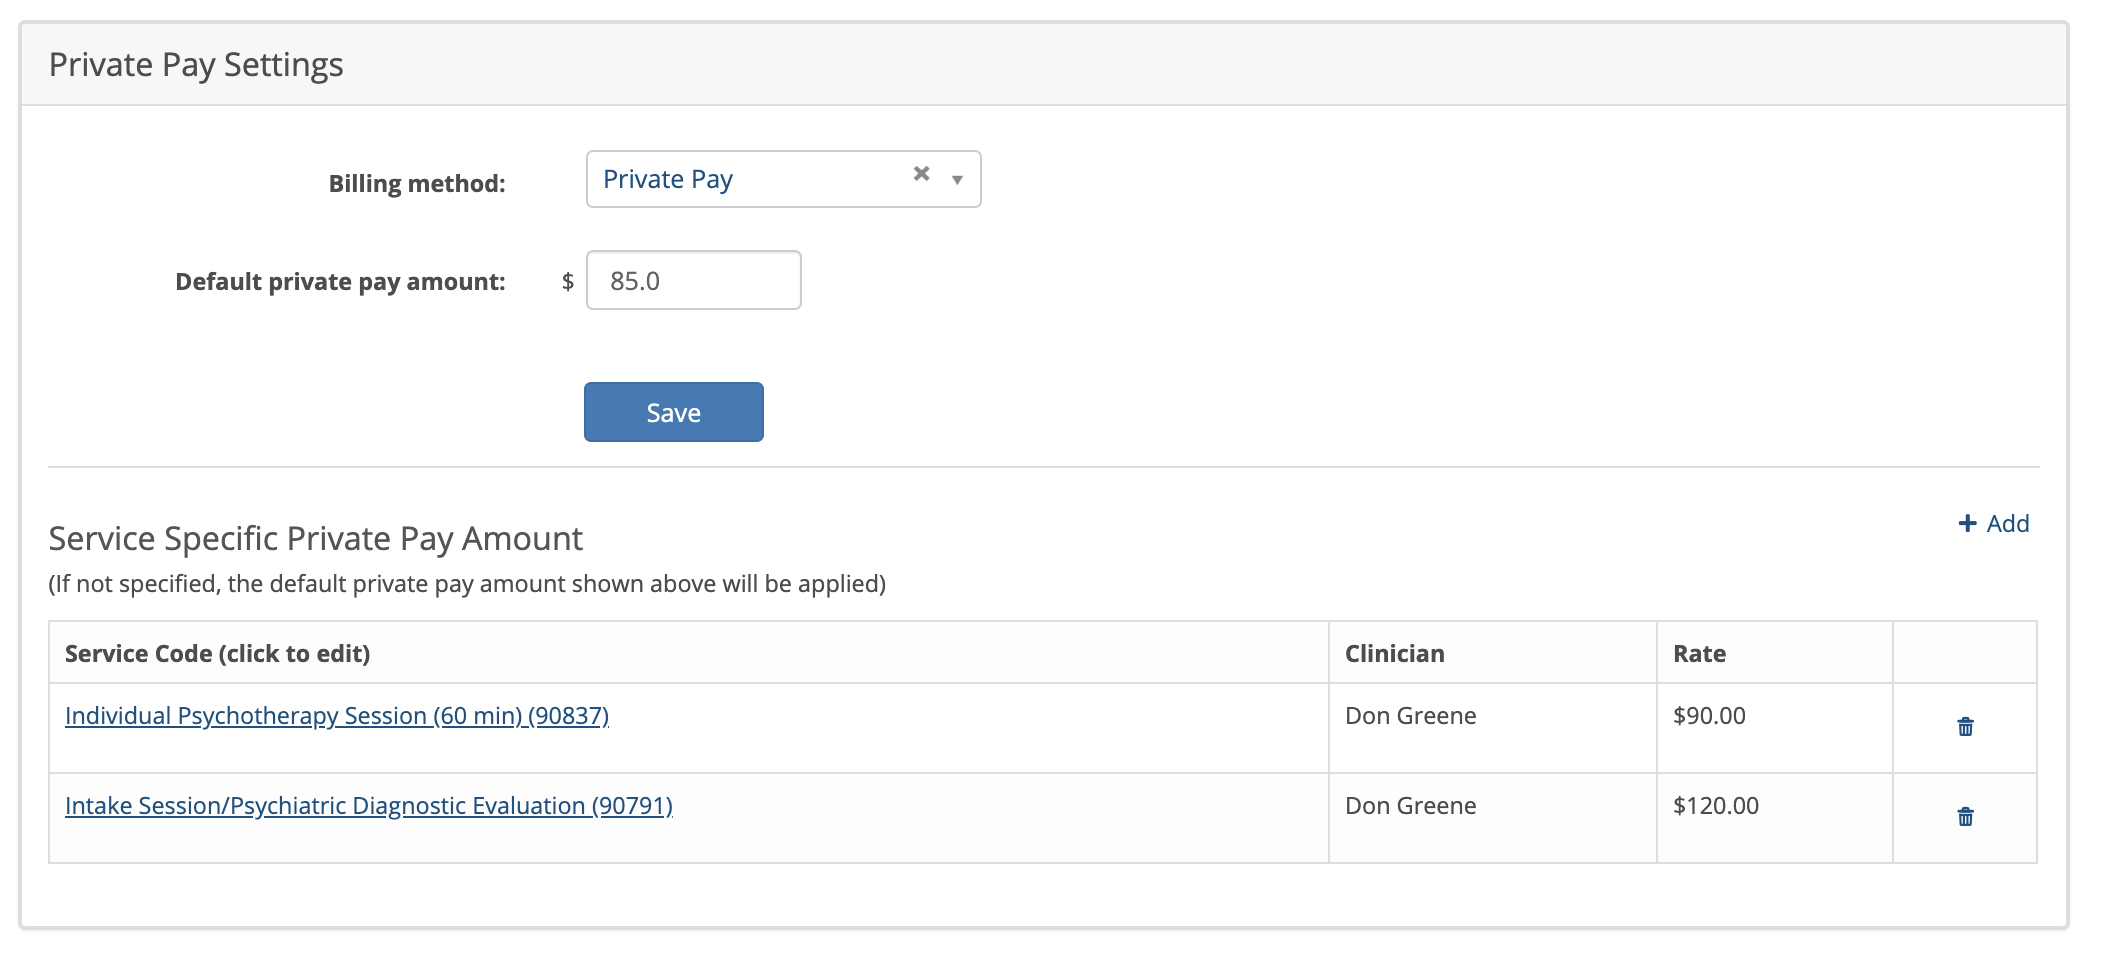
Private Pay
There are two ways to configure the Private Pay amount(s):
There are two ways to configure the Private Pay amount(s):
- If you are collecting the same fee for each session enter that in the default private pay amount box and click the Save button. Sometimes this fee is called the sliding scale rate the client was quoted.
- If you want to get more granular than just the one fee, you can add Service Specific Private Pay Amounts as shown below by clicking on the +Add button. For example, if I schedule this client for a 90791 TherapyMate would add a client charge on that invoice for $120.00. If I scheduled the client for a 90837 the client charge would be $90.00. If any other service code was used, the client would be charged $85.00.
You can configure one or both of these as needed. If you don't configure a client's fee in this area, the system will charge the Practice Rate by default.
Appointment Setting (optional)
Here you can enter your missed appointment fee if you want and select how many hours in advance you want the client to notify you before a client charge will be made. If you don't charge for missed or late cancellations, leave this blank.
Credit Cards (optional)
If you are using our recommended credit card processor (www.stripe.com), you can enter one or more credit cards in this area and keep them securely in the system. If you have two credit cards in the system, you can designate one of them as the default. For example, one credit card might be a debit card and the other one a Health Savings Account )HSA) card. If the client portal is utilized, the client can enter their own credit card information via the Client Portal as well. There more information about setting up Stripe in the Help Center.
CMS-1500 and Clearinghouse Settings (optional)
Most of the time this area is not used, but available if needed. We recommend that you check the check box next to Signature and enter the date you received a client's signature on their documents & questionnaires that were sent via the client portal. Leave the other fields blank.
Scheduling the Client
When you have the client's information page and billing settings pages completed, it is time to put an appointment on your Dashboard calendar to schedule the client for an appointment. TherapyMate will use the information from the billing settings page and appointment to create a billing invoice for the date of service.