We highly recommend that you configure your Practice Settings before adding staff members or using TherapyMate.
These settings are used throughout the program and must be done to get the best user experience.
Configuring Your Settings
Configuring Your Settings
Click on your name in the upper right-hand corner of your Dashboard and choose Settings from the drop down.
Practice settings are done by the System Administrator for the Practice. Some of these settings can also be done by the Assistant System Administrator if that role is assigned to a staff member.
Let's go down the list of options shown below:
Client Imports
This option is used if you have exported client demographic information (names, addresses, birth dates, sex, phone numbers, email addresses, marital status, language, race, and employment) from another EHR and wish to import it into TherapyMate. This enables client charts to be created in bulk. The import file must be a Comma Delimited CSV file. After the charts have been created, the Practice must configure the client's billing settings for insurance or private pay.
We recommend that you send your CSV file to our Support team so they can import it for you.
Custom Note Templates
We provide a variety of standard note templates when you subscribe to TherapyMate. Here is a list of the notes templates that are provided by default:
Contact Note
Good Faith Estimate
Intake Note
Missed Appointment Note
Process Note
Progress Note (Soap Formatted)
Progress Note (Standard Formatted)
Psychological Evaluation Note
Supervision Note
Termination Note
Treatment Plan
If needed, you can create your own note templates that would supplement this list. For example, you might want a note specific to Play Therapy. The Custom Note feature would allow you to create that note template and save it in the system for future use. Detailed instructions for creating these notes are located in the Help Center.
Client Portal Settings
The client portal has many options. You can configure the client's login page, logout time, online appointment booking, online payments, client profile and demographic, pre-admission documents & questionnaires, and the client portal welcome message. For more information see the Client Portal Settings for the Practice article in the Help Center for more details.
The client portal has many options. You can configure the client's login page, logout time, online appointment booking, online payments, client profile and demographic, pre-admission documents & questionnaires, and the client portal welcome message. For more information see the Client Portal Settings for the Practice article in the Help Center for more details.
Insurance Billing Methods
These are categories that you can use to group certain types of claims together so you can bill for them a certain way. For example, some claims might get billed through a Clearinghouse while others might get manually submitted to a provider's website. The default Billing Methods on this page will suffice for 95% of your needs. If for some reason you need to add your own Billing Method you can do that by clicking on the + Add Billing Method button.
Insurance Companies and Other Providers
If you don't take insurance you can skip this part.
If you do take insurance please take the time to add the insurance providers and other payers that you are panelled with so you can configure a client's billing settings and submit insurance claims.
Adding insurance providers to this are will create a master list of insurance providers. You won't be able to configure a client's billing settings if you don't add companies to this list first.
In this example Aetna has already been added by clicking on the + Add Provider button.
Let's add another one by clicking on the + Add Provider button.
If you don't take insurance you can skip this part.
If you do take insurance please take the time to add the insurance providers and other payers that you are panelled with so you can configure a client's billing settings and submit insurance claims.
Adding insurance providers to this are will create a master list of insurance providers. You won't be able to configure a client's billing settings if you don't add companies to this list first.
In this example Aetna has already been added by clicking on the + Add Provider button.
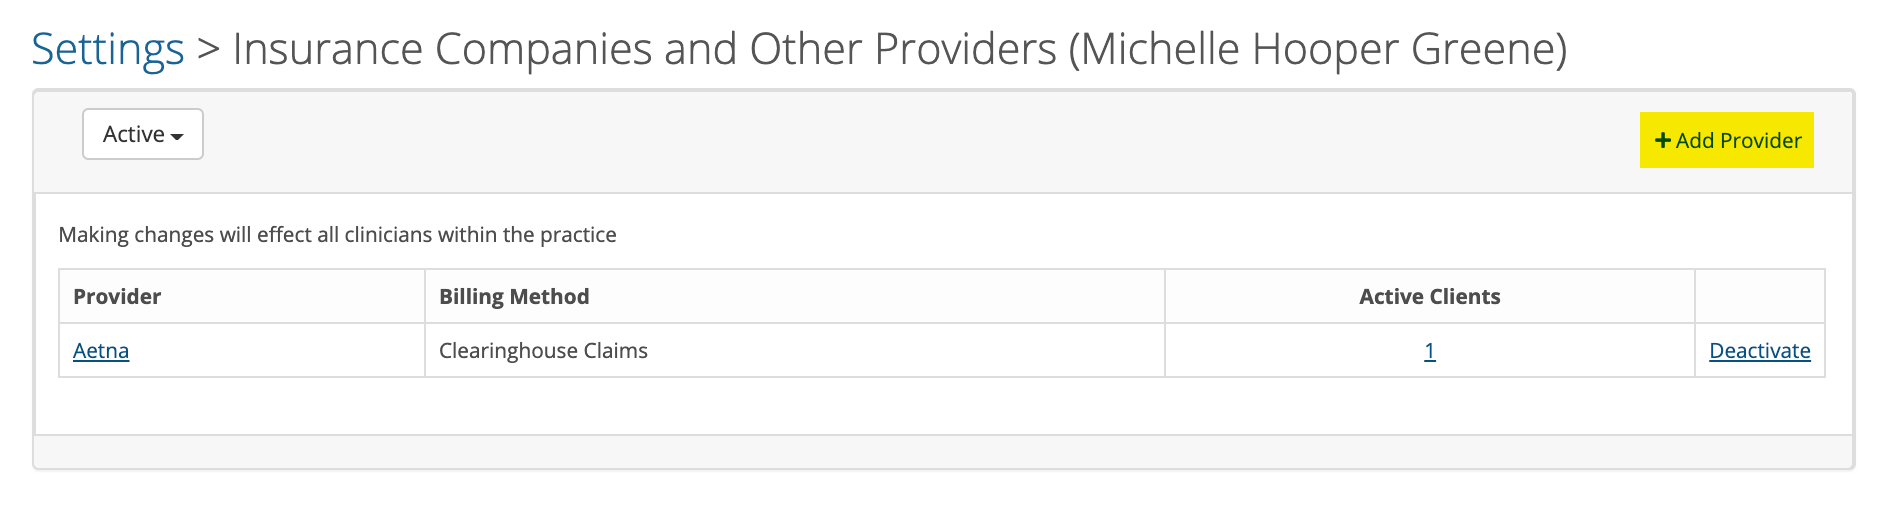
Let's add another one by clicking on the + Add Provider button.
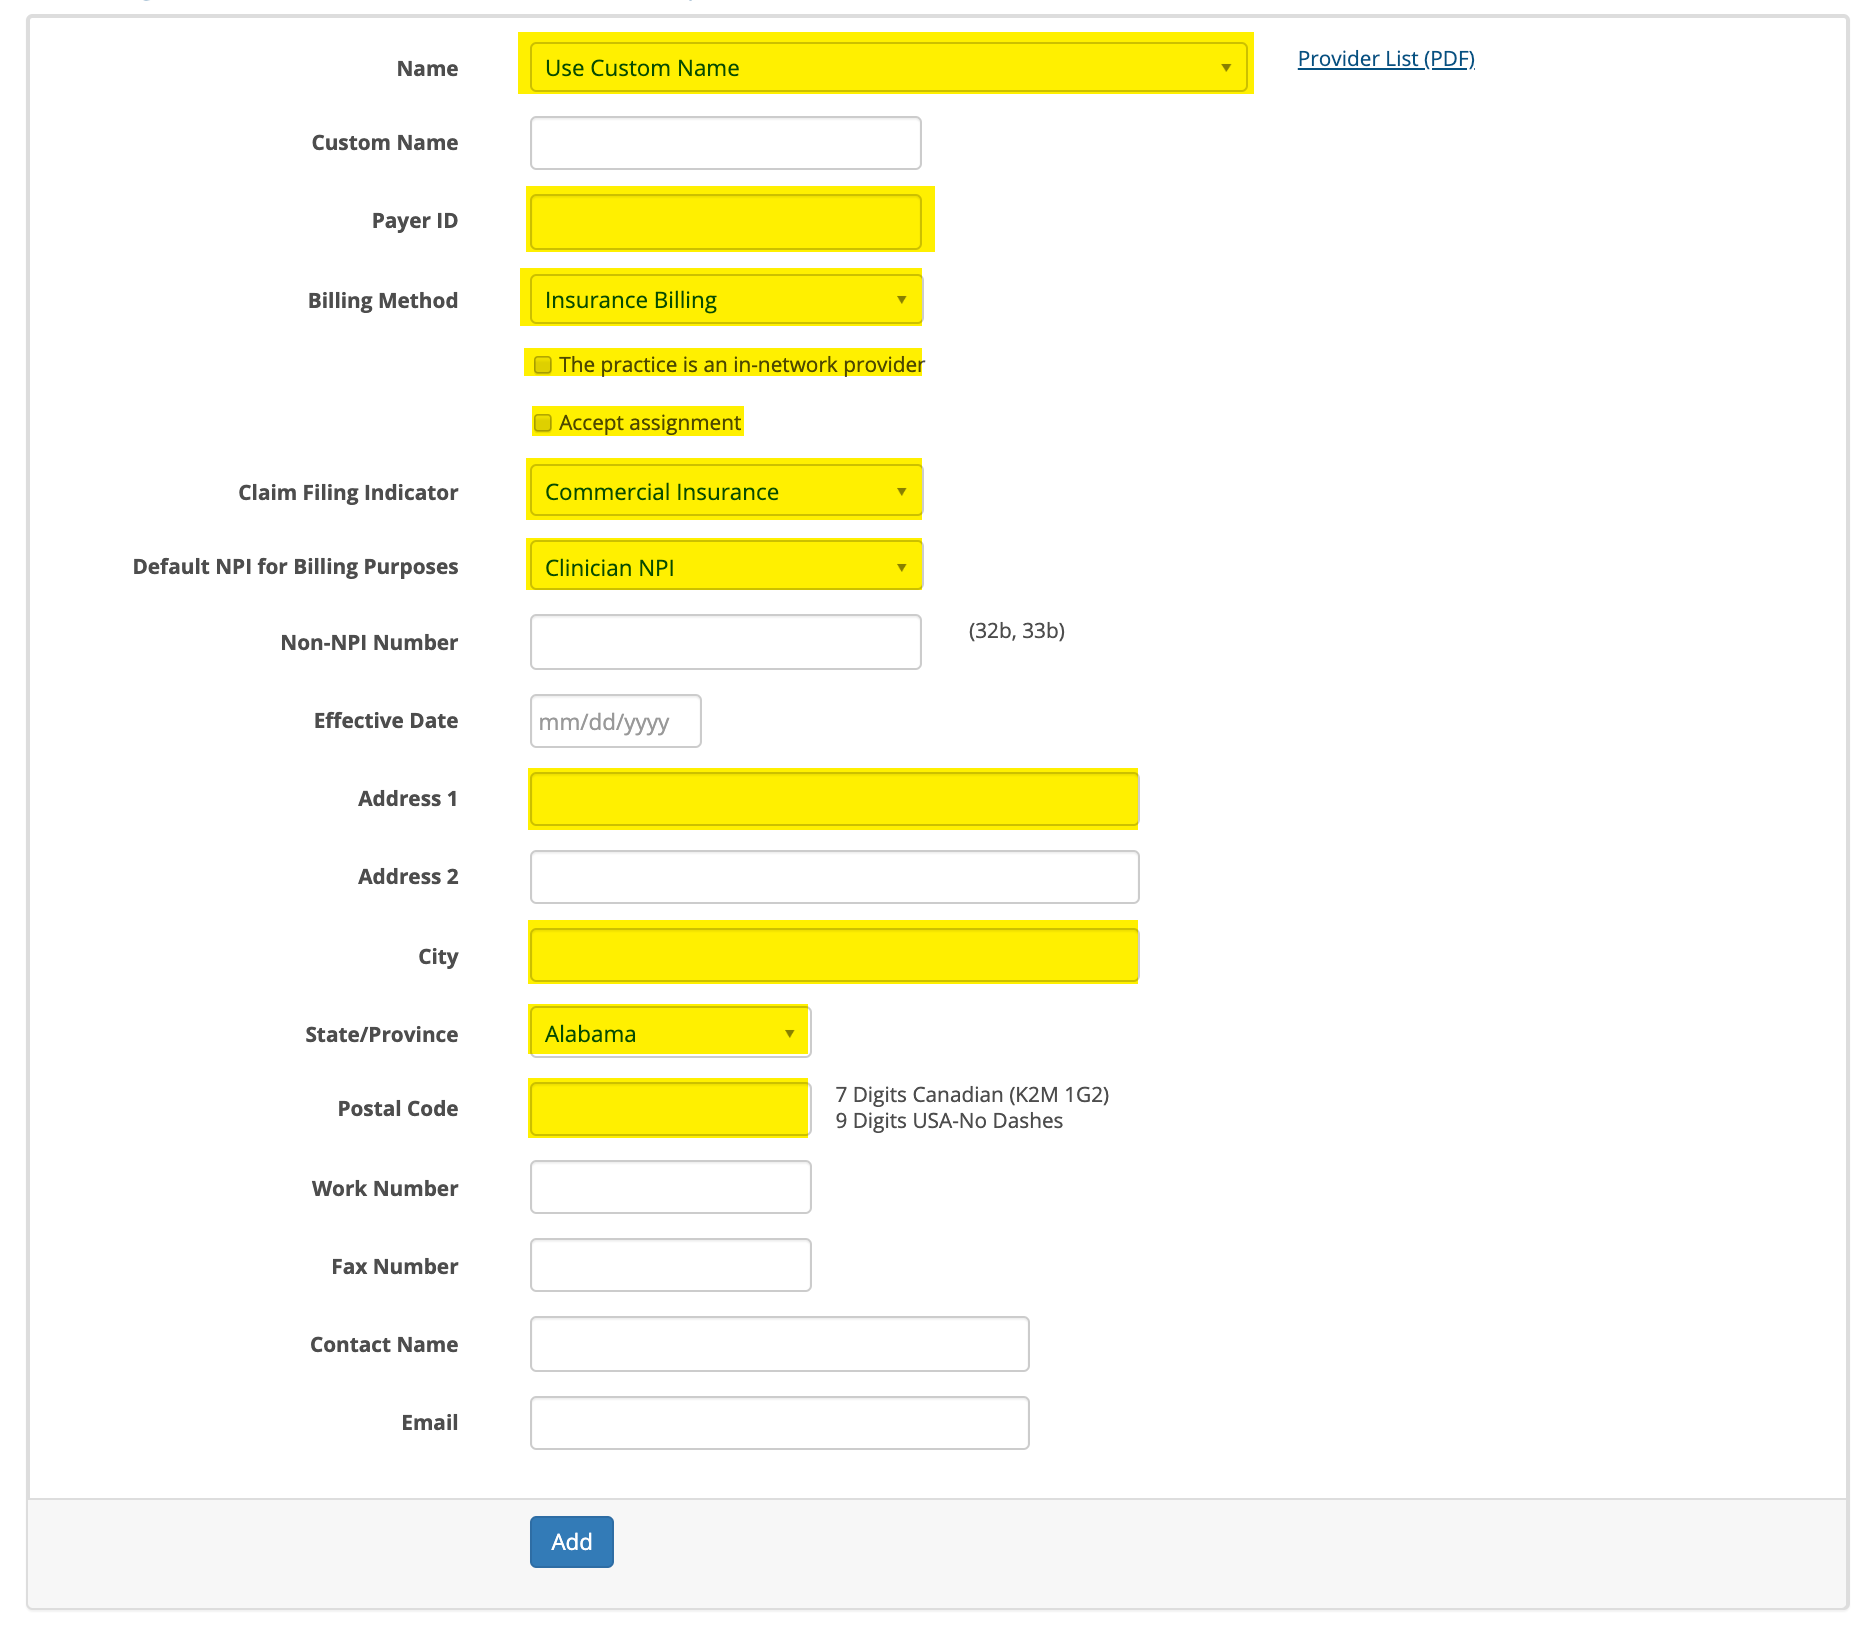
The boxes highlighted in yellow are required.
Start by clicking on the Name box at the top to see if the insurance company you need is already in the list. If you find the insurance company, select it and the Payer ID box will auto populate.
If the insurance company isn't in the list, leave the name box as Use Custom Name and type the name of the insurance company in the custom name box just below that. Next, find out what the insurance company Payer ID is and type that in. If you don't know it, call the insurance company and ask them for their Payer ID number.
If you are panelled with the insurance provider check the "The practice is an in-network provider" option.
If you want the payments to come to you instead of the client, check the box called "Accept Assignment".
The claim filing indicator is usually Commercial Insurance unless the company is Medicare or Medicaid.
Pick the NPI number type that you've setup with the insurance company.
Add the insurance company's claims mailing address including the 9 digit postal code.
Start by clicking on the Name box at the top to see if the insurance company you need is already in the list. If you find the insurance company, select it and the Payer ID box will auto populate.
If the insurance company isn't in the list, leave the name box as Use Custom Name and type the name of the insurance company in the custom name box just below that. Next, find out what the insurance company Payer ID is and type that in. If you don't know it, call the insurance company and ask them for their Payer ID number.
If you are panelled with the insurance provider check the "The practice is an in-network provider" option.
If you want the payments to come to you instead of the client, check the box called "Accept Assignment".
The claim filing indicator is usually Commercial Insurance unless the company is Medicare or Medicaid.
Pick the NPI number type that you've setup with the insurance company.
Add the insurance company's claims mailing address including the 9 digit postal code.
You don't need to enter the phone numbers, contact name or email address unless you want to keep track of this information for the insurance providers. Clinician information does NOT go in these fields.
Here is an example of what it looks like after adding Regence BCBS or Aetna

Language Spoken
Create a list of languages that will be use when creating appointments, spoken during the appointment and documented on session notes. By default you will see English and Spanish. Additional languages can be added as necessary.
Click the "Use Spoken Languages" checkbox to enable this feature.
When a new appointment is created there will be a drop down to select the language that will be used during the appointment. Select the language that is needed before saving the appointment.
Don't get creative and use this feature for any other purpose without checking with TherapyMate Support first.
This information will eventually be used in reports that will be implement in the future.
Invoice Logo
You can also upload your Practice logo which will appear in the upper left corner of our invoices. The logo must be square in shape and must be in a png, jpg, jpeg, gif format. PDF files are not allowed. The preferred file size for your logo is 100x100 pixels. If you need help sizing your logo, send it to TherapyMate support for assistance.
Manage Telehealth Clinicians
Grant or remove clinician access to TherapyMate's telehealth feature.
Master Service Locations
Add physical and virtual locations for the Practice. Assign these same locations to other staff members when you add them to the system.
It is important to add Service Locations where the Practice's services are being delivered from. Adding service locations are used for scheduling appointments, billing, Superbills and more.
To add the locations for the Practice click on the + Add Location button. If you do Telehealth sessions add that as a location separately from the locations where you see clients face to face. Here is an example of two physical locations and one telehealth location.
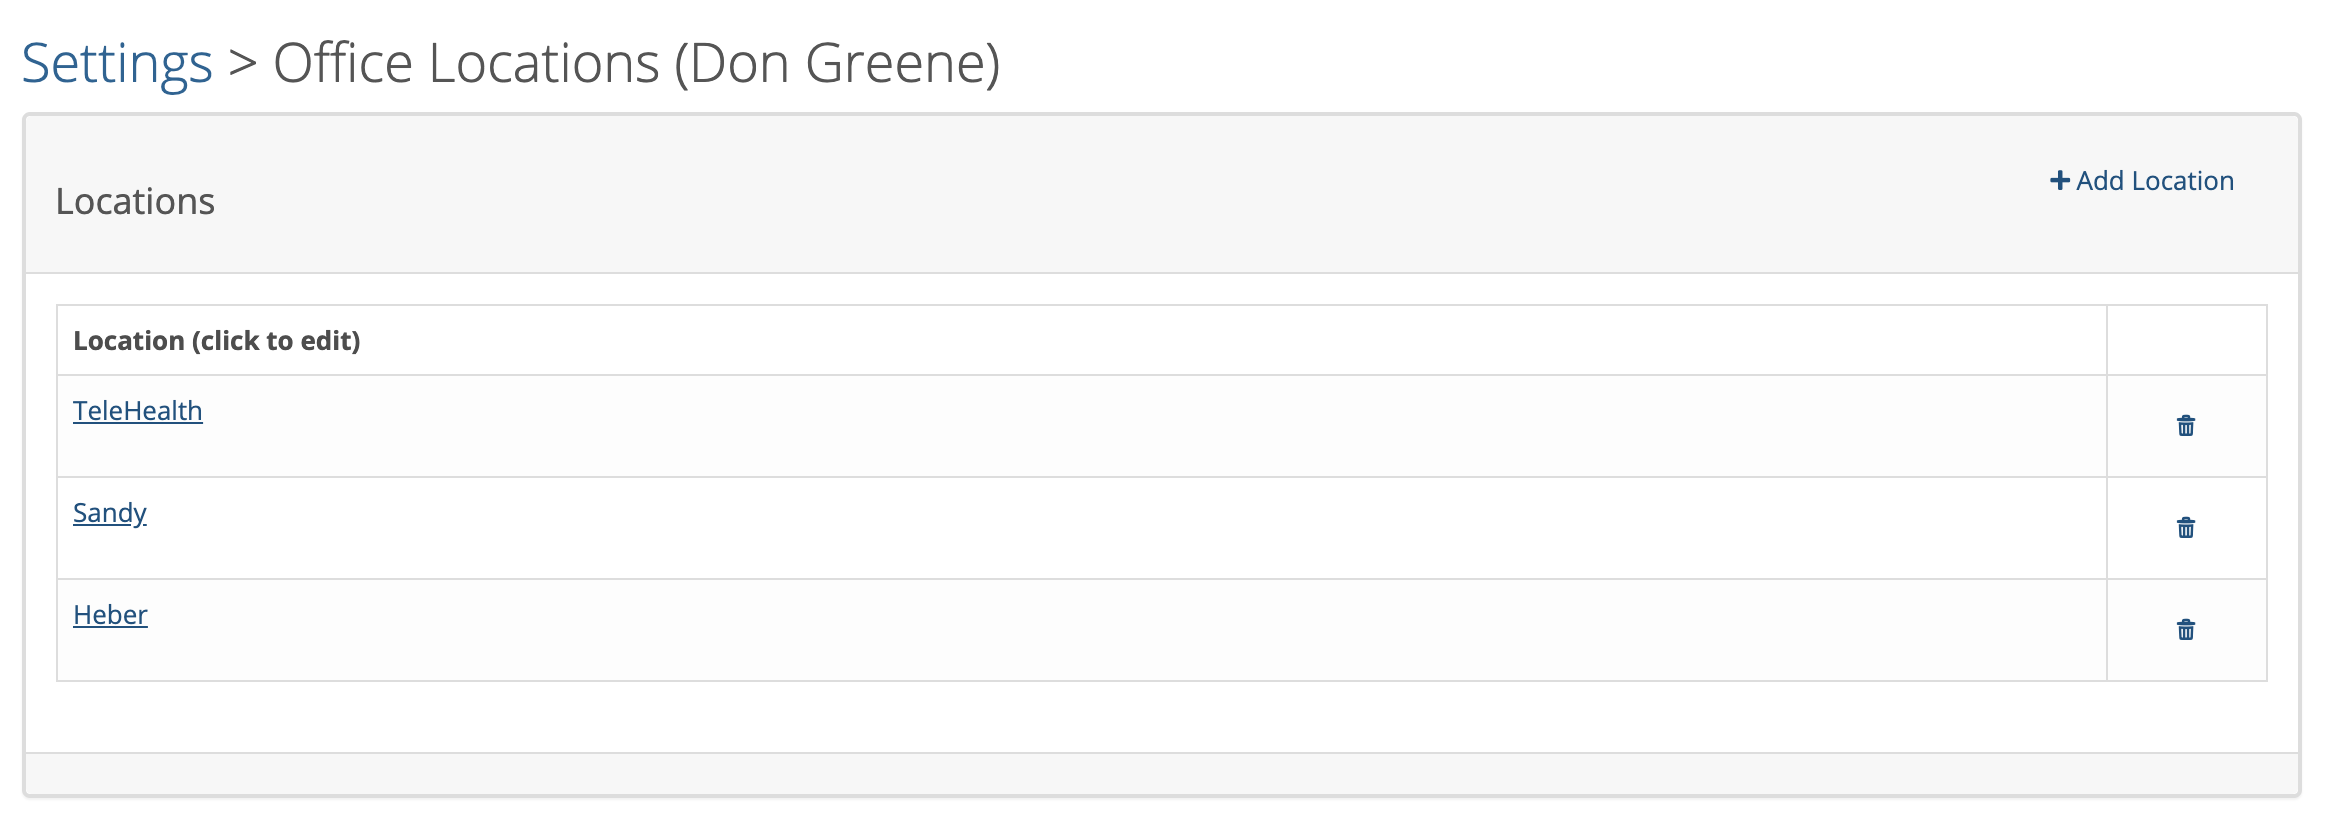
The system administrator creates the Service Locations in their settings and shares them with the other clinicians in the Practice. It is best to have only one set or list of locations that everyone uses.
The Billing Location name is usually the name of the Practice that your insurance companies know you by. The internal location can be anything you want (i.e. Main Office, 1st Ave Office, Office 1, Office 1, etc). Enter the address, city, state and 9 digit postal code. Select the Place of Service Code. Click Add when done. You will use these locations later when you create appointments for your clients.
Partner Integrations
This area allows the Practice to connect TherapyMate to some of our integration partners. Examples include Stripe for credit card processing and Claim.MD for clearinghouse billing.
One of the most useful integrations involves connecting a Stripe credit card account to TherapyMate. Clicking the blue Connect with Stripe button will allow you to create a Stripe account or login to an existing Stripe account if you know your username and password. Then you can process credit card payments directly from TherapyMate and store client credit card information securely in their chart. Clients can also make payments via the Client Portal.
TherapyMate has partnered with Claim.MD for the submission of electronic 837 insurance claims, to receive 835 payment advices and perform eligibility searches to determine client benefits. A Claim.MD account is required prior to using these features.
More partners will be added over time.
Payment Types
Payment types are used when you're recording a payment for a client and/or their insurance company. The defaults are Cash, Check, Direct Deposit, Credit Card and PayPal. You can add additional payment types like IvyPay or Zelle if you use those to take and receive payments. The only credit card company we integrate with is Stripe.
Staff
Add, change, view and set access privileges/roles for staff members. CLICK HERE for more information.
Type of Visit
Create a custom list of "Visit Types" that will be used when scheduling appointments and documented on session notes.
When a new appointment is created there will be a drop down to select the Type of Visit that will be used for the appointment. By default we provide the visit types as shown below. Additional types can be added as needed.
To enable this feature, check the box called "Use Type Of Visit". When this is enable a new drop down in the appointment window to select one of the options in the list.
Don't get creative and use this feature for any other purpose without checking with TherapyMate Support first.
This information will eventually be used in reports that will be implement in the future.
Practice Security
You can configure the Practice to require everyone to use 2 factor authentication. If is an extra layer of protection used to ensure the security of online accounts beyond just a username and password. Please read the Help Center article before attempting to turn this one or use the feature to avoid locking yourself out of the system.
TherapyMate Subscription
View the Practice's billing history, change credit card information, update the subscription level or cancel your subscription.
Conclusion
Thank, you for completing these initial settings. Now proceed with adding a new staff members (if needed) and clients. Refer to those articles for more information.